Part 3: A confidential client - traditional server side application
Introduction
This is the third article in this series. Part 1 was an introduction to the world of Authentication and Authorisation. Part 2created and demonstrated all the components involved in providing security where the client is ‘public’ and cannot store secrets securely. This article builds on that and creates a similar arrangement, this time where the client is ‘confidential’.
In this example, the client itself is a traditional web application in the form of a Spring Boot application that serves HTML content as ‘Server Side Rendered’ pages, meaning the server itself creates the HTML that will be returned to, and ultimately be displayed in the user’s browser. These types of applications typically involve a HTTP session to maintain user state, the server application will return a Set-Cookie HTTP header to store the session identifier in the user’s browser as a cookie - this cookie will then be returned on each HTTP request the browser makes, allowing the application to lookup any data associated with the session.
This article aims to do the following
- Re-use the Keycloak instance set up in Part 2 as the Authorisation Server.
- Create a new ‘confidential’ OAuth client in Keycloak.
- Create a Spring Boot traditional Web Application to act as the OAuth client.
- Show how all the moving parts are wired together to provide authentication and authorisation via OIDC / OAuth2.
Creating a Keycloak confidential client
With the same Keycloak instance running in Docker and configured as it was in Part 2 of this series, we will now create a new OAuth client in Keycloak for this scenario. Note that this time, the client will be of type ‘confidential’, rather than ‘public’.
Create Oauth Client
To create a client, ensuring that the lydtech realm is selected in the Keycloak admin console at http://localhost:8080/admin, navigate to ‘Clients’ and click ‘Create Client’. You will have 3 pages to complete.
Under ‘General Settings’, Client Type needs to be ‘OpenID Connect’. Choose an appropriate clientID - ‘lydtech-confidential-client’ in this case

Next under ‘Capability config’, ensure the following:
- Ensure ‘Client authentication’ is enabled. This is what makes this client ‘confidential’, rather than ‘public’.
- For authentication flows, ensure only ‘Standard flow’ is selected - this is the ‘Authorisation Code’ flow that we focused on in Part 1. ‘Direct access grants’ will be enabled by default, but we do not want this; this is effectively a ‘Password’ grant type which is discouraged, and deprecated in OAuth 2.1.
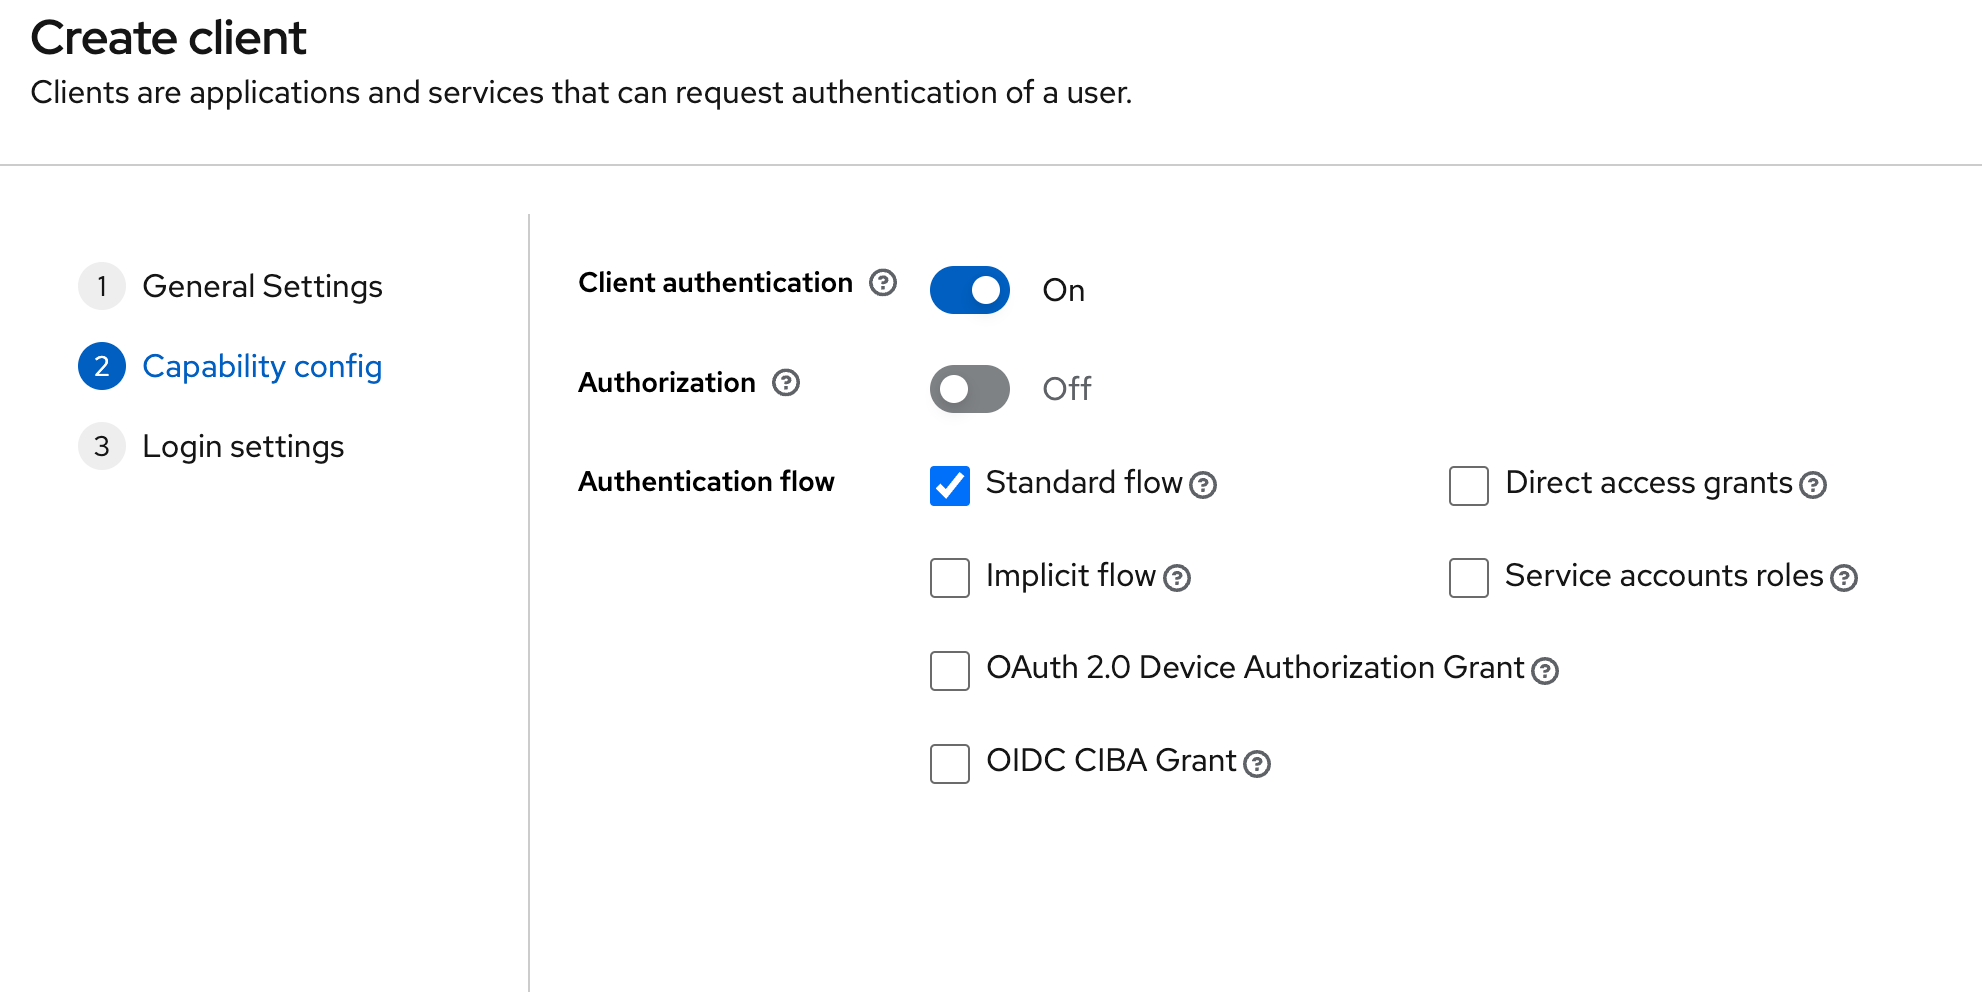
Finally, under ‘Login Settings’ we only need to provide a URL for ‘Valid redirect URIs’ - anything for localhost:8082 is fine in our case (our Spring Boot app will be running on localhost:8082), so enter http://localhost:8082/*. We do not need to set a value for ‘Web origins’ - in this example, there will be no cases of Javascript in the browser calling any Keycloak endpoints directly.

We will test this new client once we’ve created the Spring Boot application.
Now that the client has been created. There is one notable difference as a result of the fact that this is a ‘confidential’ client. Note the additional ‘Credentials’ tab when viewing the client in the Keycloak admin area. From this tab, you can get the value of the client_secret that the Spring Boot application will need to pass across to the Authorisation Server for every call to /token as we will see later. For now, just be aware of where this value is made available from.

As a final step, in order to user Spring's oauth2 client support, we must tell Keycloak to add the Realm Roles to the response of the /userInfo endpoint. To do this, navigate to Client Scopes->roles->Mappers->realm roles. Enable the Add to userinfo button as per the screenshot below

Creating a Spring Boot application
Create the project
Now that we have a client configured in the Authorisation Server, we can create our Spring Boot application which will act as the OAuth client. We will follow the approach from the Part 2 article and add 3 endpoints to demonstrate Authorisation in play.
Visit start.spring.io to create the template for the application. Use settings such as those in the image below but be sure to include the following dependencies:
- Spring Web - Needed to provide the Web components
- Lombok - Helps to reduce boilerplate code
- OAuth2 Client - pulls in the required dependencies to configure the service as an OAuth client
- Thymeleaf - A templating engine for generating HTML
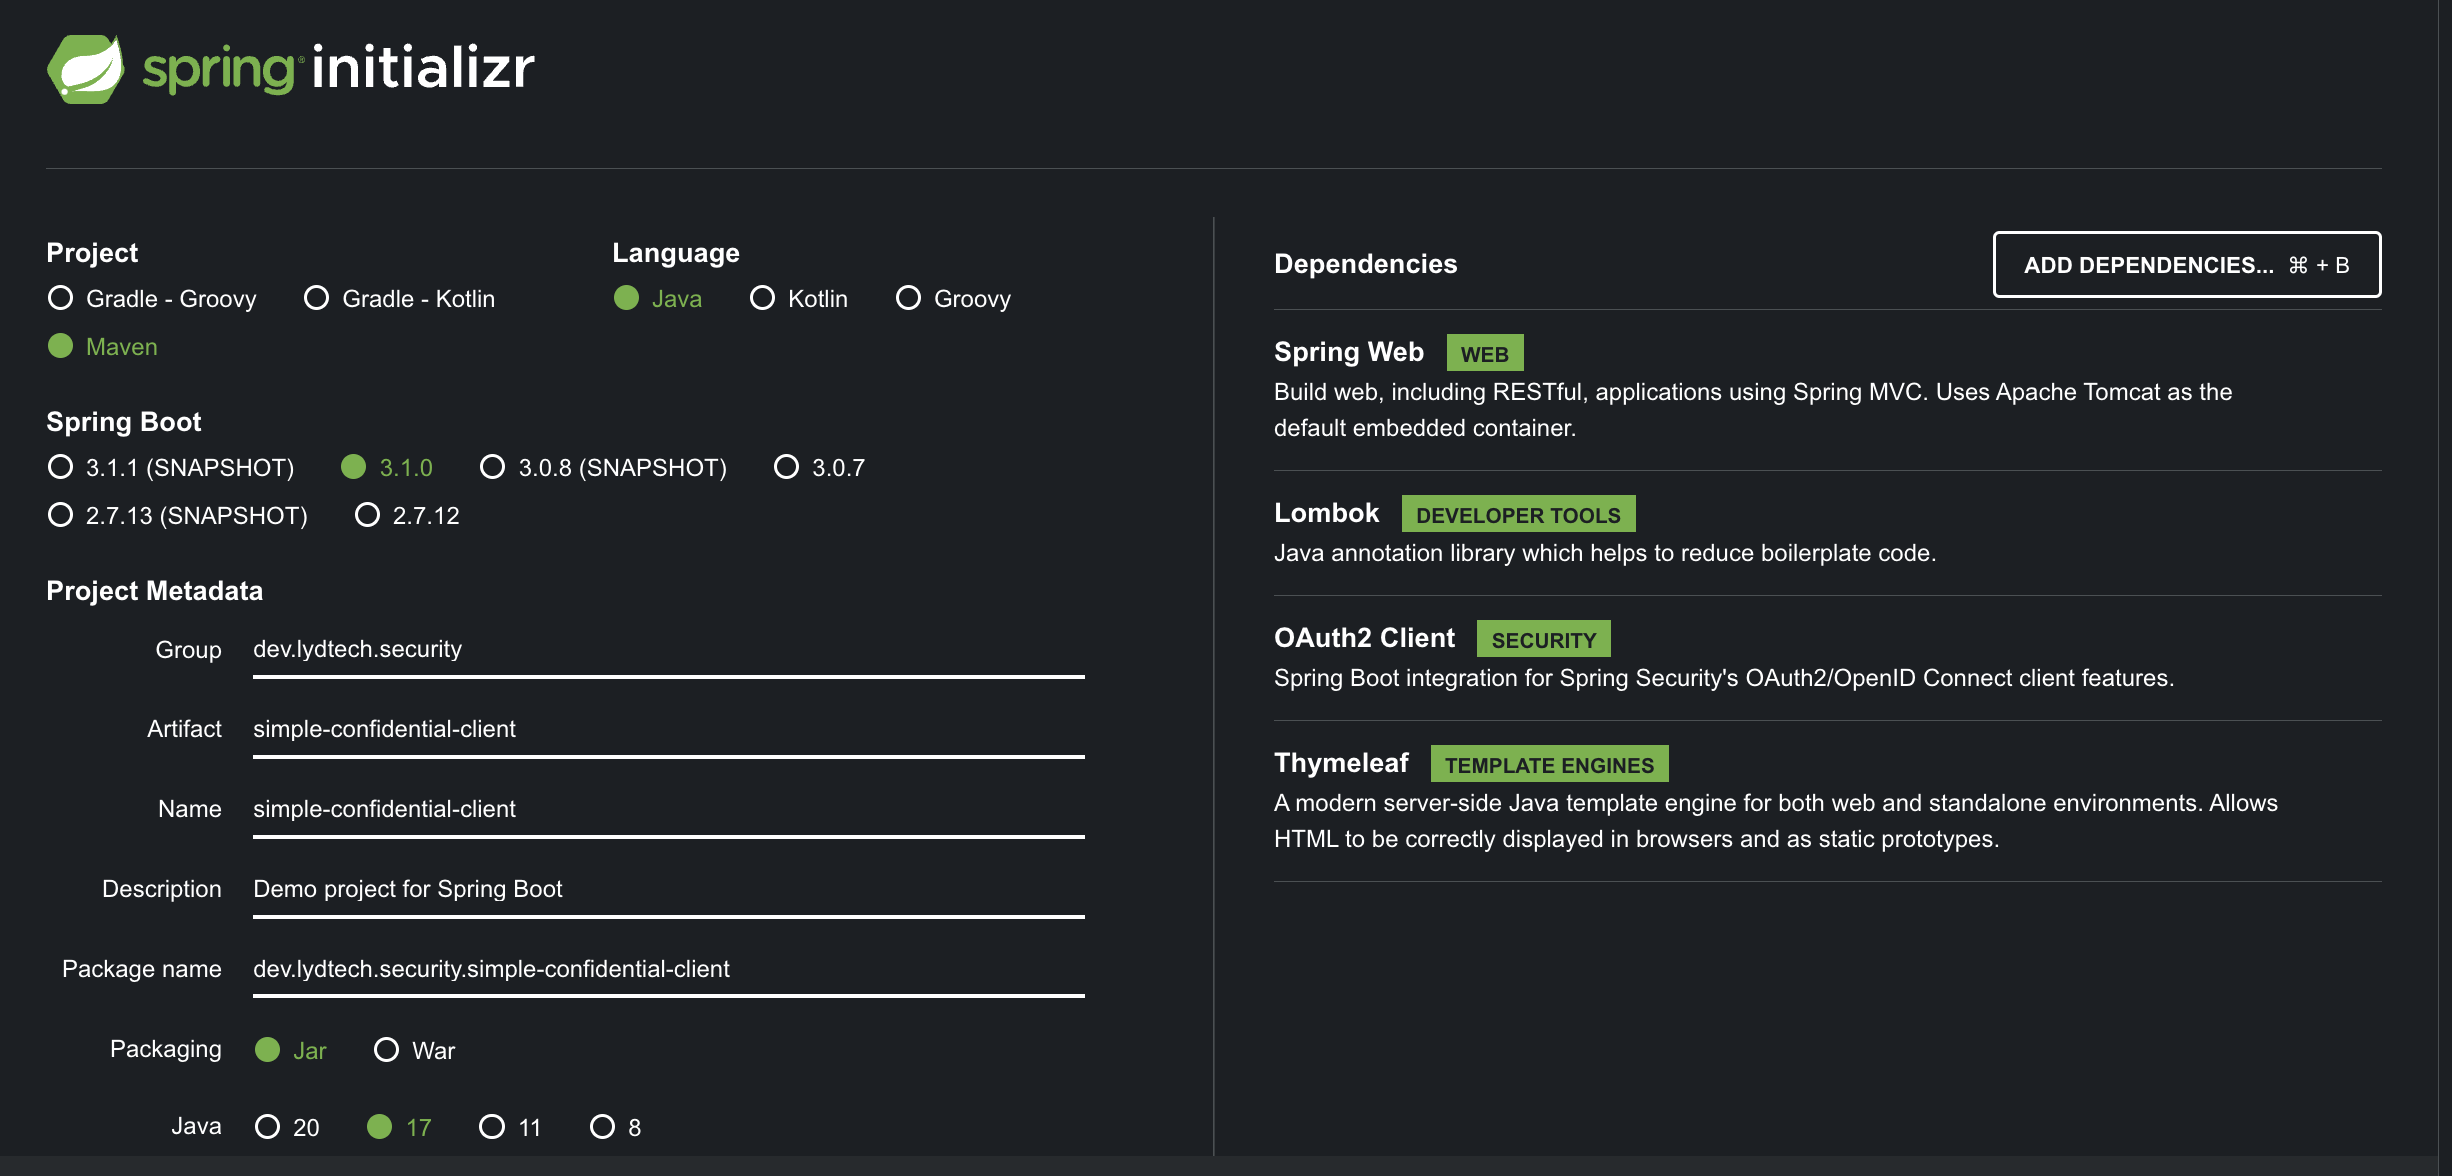
Click Generate to download a zip file containing the project, unzip this project in a suitable directory and open it in your favourite IDE.
Create Controller
Similar to our public client example from Part 2, we will introduce 3 areas in our application in order to demonstrate authorisation. The resulting endpoints are as follows:
- ‘/’ - the home page. This is public and does not require any authentication to be able to access
- ‘/users’ - is an area that is available to authenticated users and admin users
- ‘/admin’ - is an area only available to authenticated admin users
Complete controllers/MyController.java file available in the Github repository
package dev.lydtech.security.simpleconfidentialclient.controllers;

import lombok.extern.slf4j.Slf4j;
import org.springframework.security.core.AuthenticatedPrincipal;
import org.springframework.security.core.context.SecurityContextHolder;
import org.springframework.stereotype.Controller;
import org.springframework.ui.Model;
import org.springframework.web.bind.annotation.GetMapping;
import org.springframework.web.bind.annotation.RequestMapping;

import java.security.Principal;

@Controller
@Slf4j
@RequestMapping("/")
public class MyController {

    @GetMapping(path = "/")
    public String index(Model model) {
        // Need to look up principal here. By including it as a method param, Spring will redirect to login (which isn't required for this endpoint)
        Object principal = SecurityContextHolder.getContext().getAuthentication().getPrincipal();
        if (principal instanceof AuthenticatedPrincipal user) {
            model.addAttribute("username", user.getName());
        }
        return "public";
    }

    @GetMapping(path = "/users")
    public String users(Principal principal, Model model) {
        model.addAttribute("username", principal.getName());
        return "users";
    }

    @GetMapping(path = "/admin")
    public String admin(Principal principal, Model model) {
        model.addAttribute("username", principal.getName());
        return "admin";
    }
}
Some key points to highlight in this class:
- The class is annotated with
@Controllerand@RequestMappingto allow it to act as a Controller - @GetMapping is used for each of the 3 endpoints. Each of the endpoints has a Model parameter and, using the MVC pattern, objects are attached to the model to be displayed in the appropriate view. Each method returns a string which is the name of the View it maps to. The 2 secured endpoints (/users and /admin) have a second method parameter of type java.security.Principal - this will contain details of the authenticated user.
- Note that the unauthenticated endpoint (/home) does not include a Principal parameter - it does return details of any associated Principal, but it must look this up otherwise Spring redirects unauthenticated users to the login page before they can even see the home page
Create the Views
Thymeleaf is used as the templating engine to create HTML. The full template files required are available in the GitHub repository. All 4 must be copied into src/main/resources/templates, as per Spring Boot convention:
Excerpts from key template files are shown below:
public.html
<div class="container">
    <div class="jumbotron text-center">
        <h1>Sample App<<h1>
    </div>
    <div>
        <div class="well">
            <a th:href="@{/admin}">Admin Area</a>
        </div>
        <div class="well">
            <a th:href="@{/users}">User Area</a>
        </div>
        <div class="well" th:if="${username != null}">
            <p>You are logged in as <span th:text="${username}">--name--</span></p>
            <a href="/logout">Logout</a>
        </div>
        <div class="well" th:if="${username == null}">
            <p>You are not logged in </p>
        </div>
    </div>
</div>
admin.html / users.html
These views represent the secured pages. They are very similar to one another so only the admin page has been included below. A simple header is displayed to show which page this is and the username is displayed (which was set on the Model component by the Controller above). Both pages also display a logout option because in order to see this page, the user must be authenticated
<div id="container">
    <div class="jumbotron text-center">
        <h1>Sample App</h1>
    </div>
    <div>
        <div class="well">
            <h1>
                Admin Area
            </h1>
            <p>Hello, <span th:text="${username}">--name--</span>.</p>
            <div>
                <a href="/logout">Logout</a>
            </div>
        </div>
    </div>
</div>
Configure Security
To configure the security of this application, we add a Spring Configuration class as follows. Complete SecurityConfig.java file available in the Github repository
package dev.lydtech.security.simpleconfidentialclient;

import org.springframework.context.annotation.Bean;
import org.springframework.context.annotation.Configuration;
import org.springframework.security.config.annotation.web.builders.HttpSecurity;
import org.springframework.security.config.annotation.web.configuration.EnableWebSecurity;
import org.springframework.security.core.GrantedAuthority;
import org.springframework.security.core.authority.SimpleGrantedAuthority;
import org.springframework.security.core.authority.mapping.GrantedAuthoritiesMapper;
import org.springframework.security.core.session.SessionRegistryImpl;
import org.springframework.security.oauth2.client.oidc.web.logout.OidcClientInitiatedLogoutSuccessHandler;
import org.springframework.security.oauth2.client.registration.ClientRegistrationRepository;
import org.springframework.security.oauth2.core.oidc.OidcUserInfo;
import org.springframework.security.oauth2.core.oidc.user.OidcUserAuthority;
import org.springframework.security.web.SecurityFilterChain;
import org.springframework.security.web.authentication.session.RegisterSessionAuthenticationStrategy;
import org.springframework.security.web.authentication.session.SessionAuthenticationStrategy;

import java.net.URI;
import java.util.Collection;
import java.util.HashSet;
import java.util.Map;
import java.util.Set;

import static org.springframework.security.config.Customizer.withDefaults;

@Configuration
@EnableWebSecurity
class SecurityConfig {

    @Bean
    protected SessionAuthenticationStrategy sessionAuthenticationStrategy() {
        return new RegisterSessionAuthenticationStrategy(new SessionRegistryImpl());
    }

    @Bean
    OidcClientInitiatedLogoutSuccessHandler oidcLogoutSuccessHandler(ClientRegistrationRepository clientRegistrationRepository) {
        OidcClientInitiatedLogoutSuccessHandler successHandler = new OidcClientInitiatedLogoutSuccessHandler(clientRegistrationRepository);
        successHandler.setPostLogoutRedirectUri(URI.create("http://localhost:8082").toString());
        return successHandler;
    }


    @Bean
    public SecurityFilterChain filterChain(HttpSecurity http, OidcClientInitiatedLogoutSuccessHandler oidcLogoutSuccessHandler) throws Exception {
        http.authorizeHttpRequests(authorise ->
                authorise
                        .requestMatchers("/")
                        .permitAll()
                        .requestMatchers("/admin*")
                        .hasRole("admin")
                        .requestMatchers("/users*")
                        .hasAnyRole("user", "admin")
                        .anyRequest()
                        .authenticated());
        http.oauth2Login(withDefaults())
                .logout(logout ->
                        logout.logoutSuccessHandler(oidcLogoutSuccessHandler));
        return http.build();
    }
...
Note the following:
- The class is annotated with @Configuration and @EnableWebSecurity
- A SessionAuthenticationStrategy is registered with a default implementation to manage sessions and authenticated principals.
- An OidcClientInitiatedLogoutSuccessHandler Bean is configured which will allow user-initiated logouts to force a logout in Keycloak, via the browser.
- Adds Authorisation config to allow
- Public access to home (‘/’)
- Admin only access to anything under ‘/admin’
- User and admin access to /users
- Registers the
OidcClientInitiatedLogoutSuccessHandlerinstance as a logout success handler in Spring Security.
There is also one more Bean registered in this config file which is included below. It performs a similar function to the class in Part 2 that extracts realm roles (this time from the /userinfo response) and creates Granted Authorities to attach to the resulting Principal
    @Bean
    public GrantedAuthoritiesMapper userAuthoritiesMapper() {
        return (authorities) -> {
            Set<GrantedAuthority> mappedAuthorities = new HashSet<>();

            authorities.forEach(authority -> {
                if (authority instanceof OidcUserAuthority oidcUserAuthority) {

                    OidcUserInfo userInfo = oidcUserAuthority.getUserInfo();

                    // Map the claims found in idToken and/or userInfo
                    // to one or more GrantedAuthority's and add it to mappedAuthorities
                    Map<String, Object> realmAccess = userInfo.getClaim("realm_access");
                    Collection<String> realmRoles;
                    if (realmAccess != null
                            && (realmRoles = (Collection<String>) realmAccess.get("roles")) != null) {
                        realmRoles
                                .forEach(role -> mappedAuthorities.add(new SimpleGrantedAuthority("ROLE_" + role)));
                    }

                }
            });

            return mappedAuthorities;
        };
    }
Add properties
Finally, lets add the required properties for Spring Boot to configure everything correctly. Replace the contents of src/main/resources/application.properties with application.properties explained in the extracts below
Use port 8082 for this application
server.port=8082
Configure the Spring Security oauth client settings with the correct client-id and secret (NOTE: you must replace in client-secret below with the secret value of the Oauth client in Keycloak as configured earlier). Also indicate that the authorization_code grant type should be used and only the openid and profile scopes are required for now
spring.security.oauth2.client.registration.keycloak.client-id=lydtech-confidential-client
spring.security.oauth2.client.registration.keycloak.client-secret=<REPLACE_ME>
spring.security.oauth2.client.registration.keycloak.authorization-grant-type=authorization_code
spring.security.oauth2.client.registration.keycloak.scope=openid,profile
Configure the issuer-uri and the user-name-attribute to be extracted from the JWTs preferred_username field
spring.security.oauth2.client.provider.keycloak.issuer-uri=http://localhost:8080/realms/lydtech
spring.security.oauth2.client.provider.keycloak.user-name-attribute=preferred_username
Set the logging level of all Spring Security classes to trace, this is very useful for showing what goes on at each step
logging.level.org.springframework.security=trace
Testing the end result
Start the applications
Ensure Keycloak is running in Docker. Run the Spring Boot application using the command
./mvnw spring-boot:run
or running the SimpleConfidentialClientApplication in your IDE
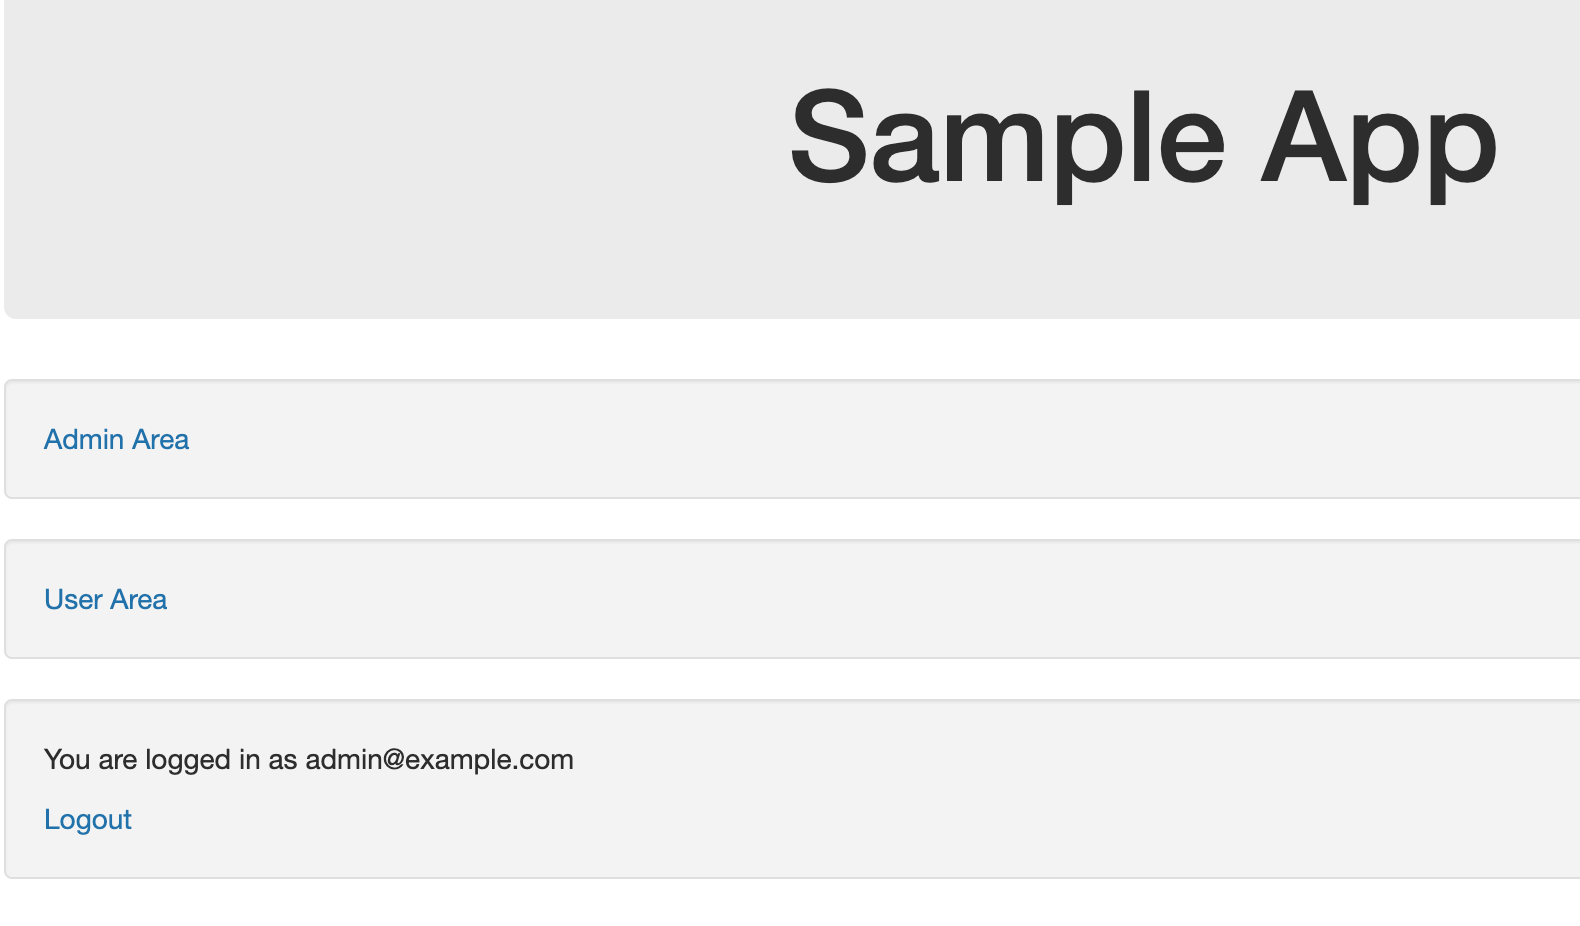
Test public home page
Access http://localhost:8082 in a browser. You should see a screen similar to the one below. Note that you are not logged in but are still allowed to access this page, as per the configuration

Test admin user access
Click the ‘user Area’ link or access http://localhost:8082/users in a browser. Note that you are immediately redirected to the Keycloak login screen.
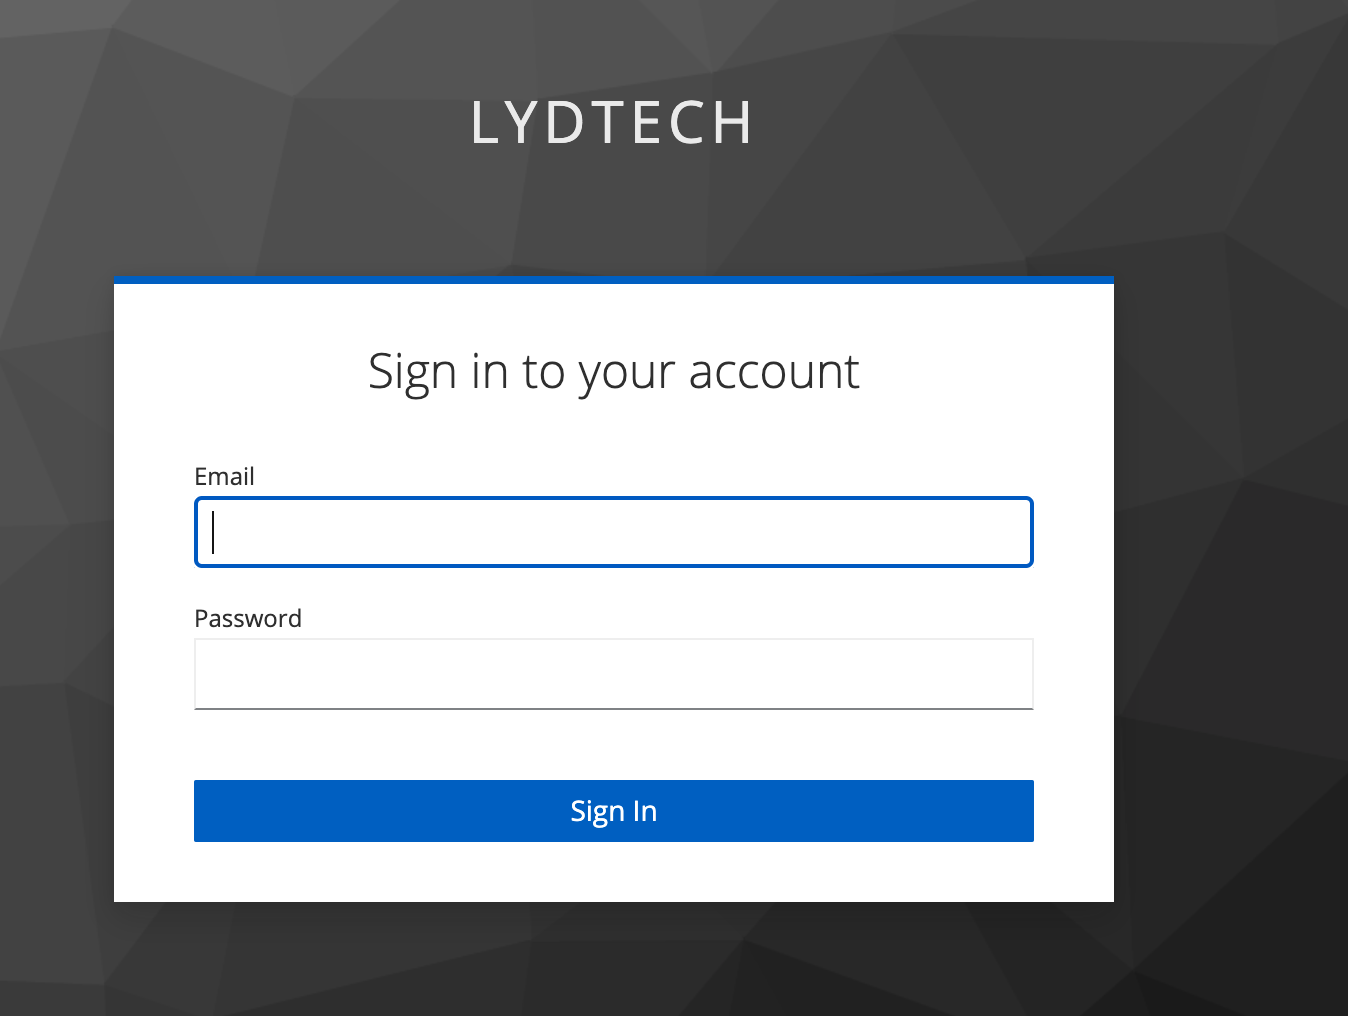
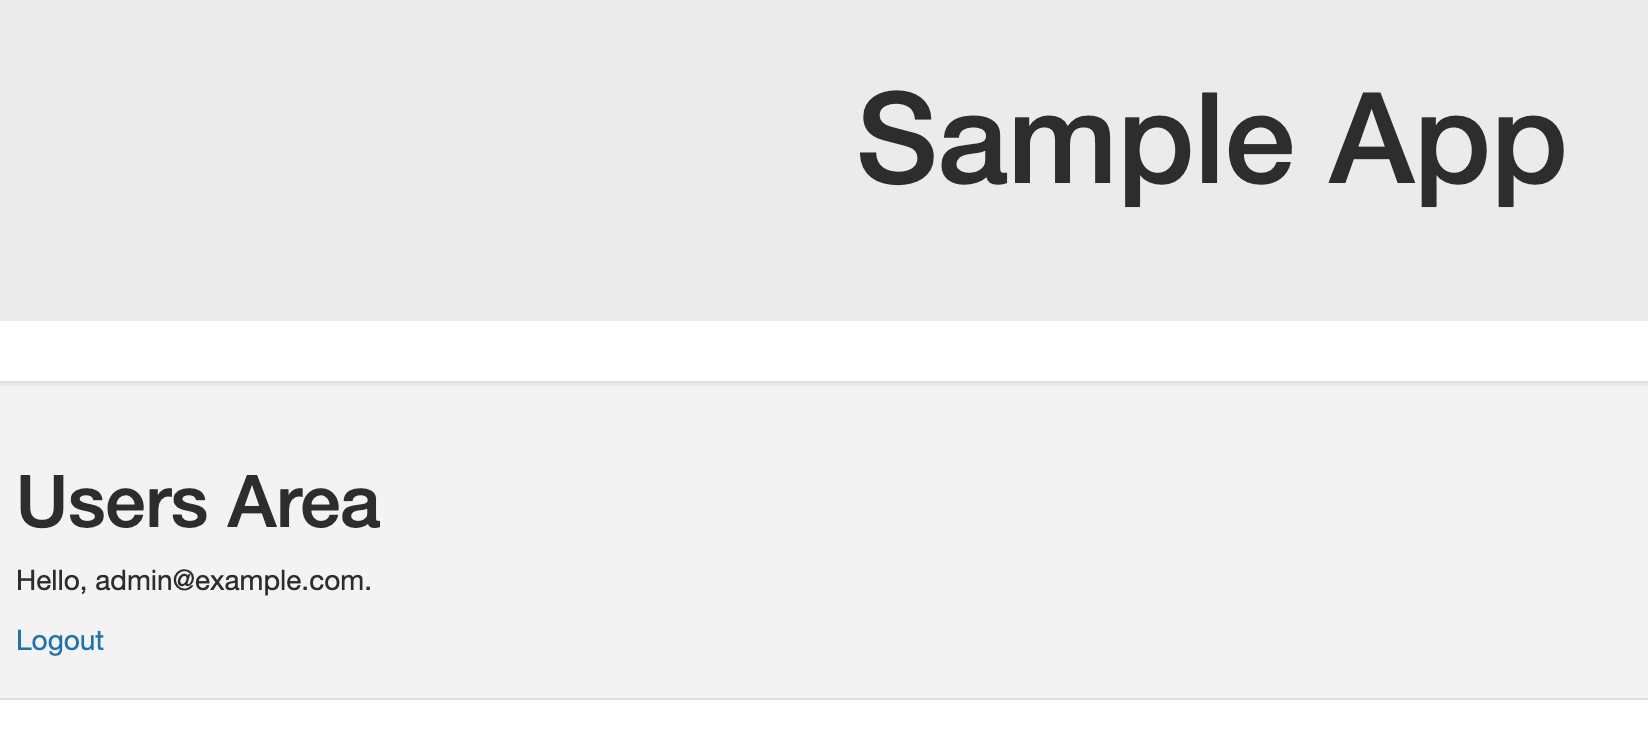
Log in using the admin@example.com user and observe that you are redirected to the /users page as per the image below. The username is shown on the page.
Head back to http://localhost:8082 and see that the message has now changed to show that you are logged in as the admin user.
Finally, head to http://localhost:8082/admin or follow the ‘Admin Area’ link and observe that you are shown the admin page.

Testing a non Admin user
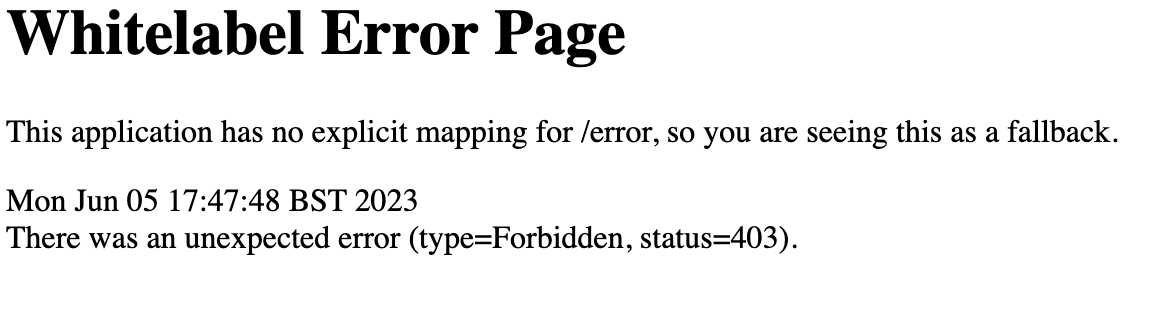
Click the Logout link. You will be redirected back to the home page. Click the ‘Admin Area’ link but this time log in as the user@example.com non admin user. Observe that you are not allowed to access this page because you lack the ‘admin’ role. The error page needs configuring in Spring Boot but you can see that access was denied via a HTTP 403 response code
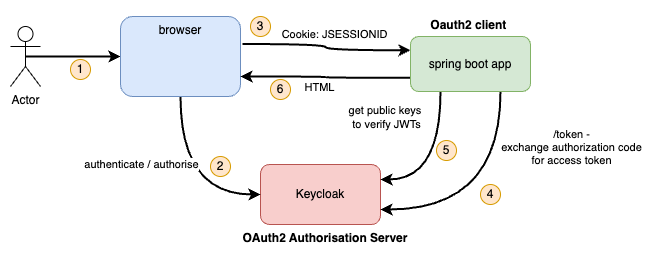
Following the Authorisation Code flow
In the same way as we did for the public client scenario, let's follow the steps of the Authorisation Code flow. The sequence diagram below depicts this flow.
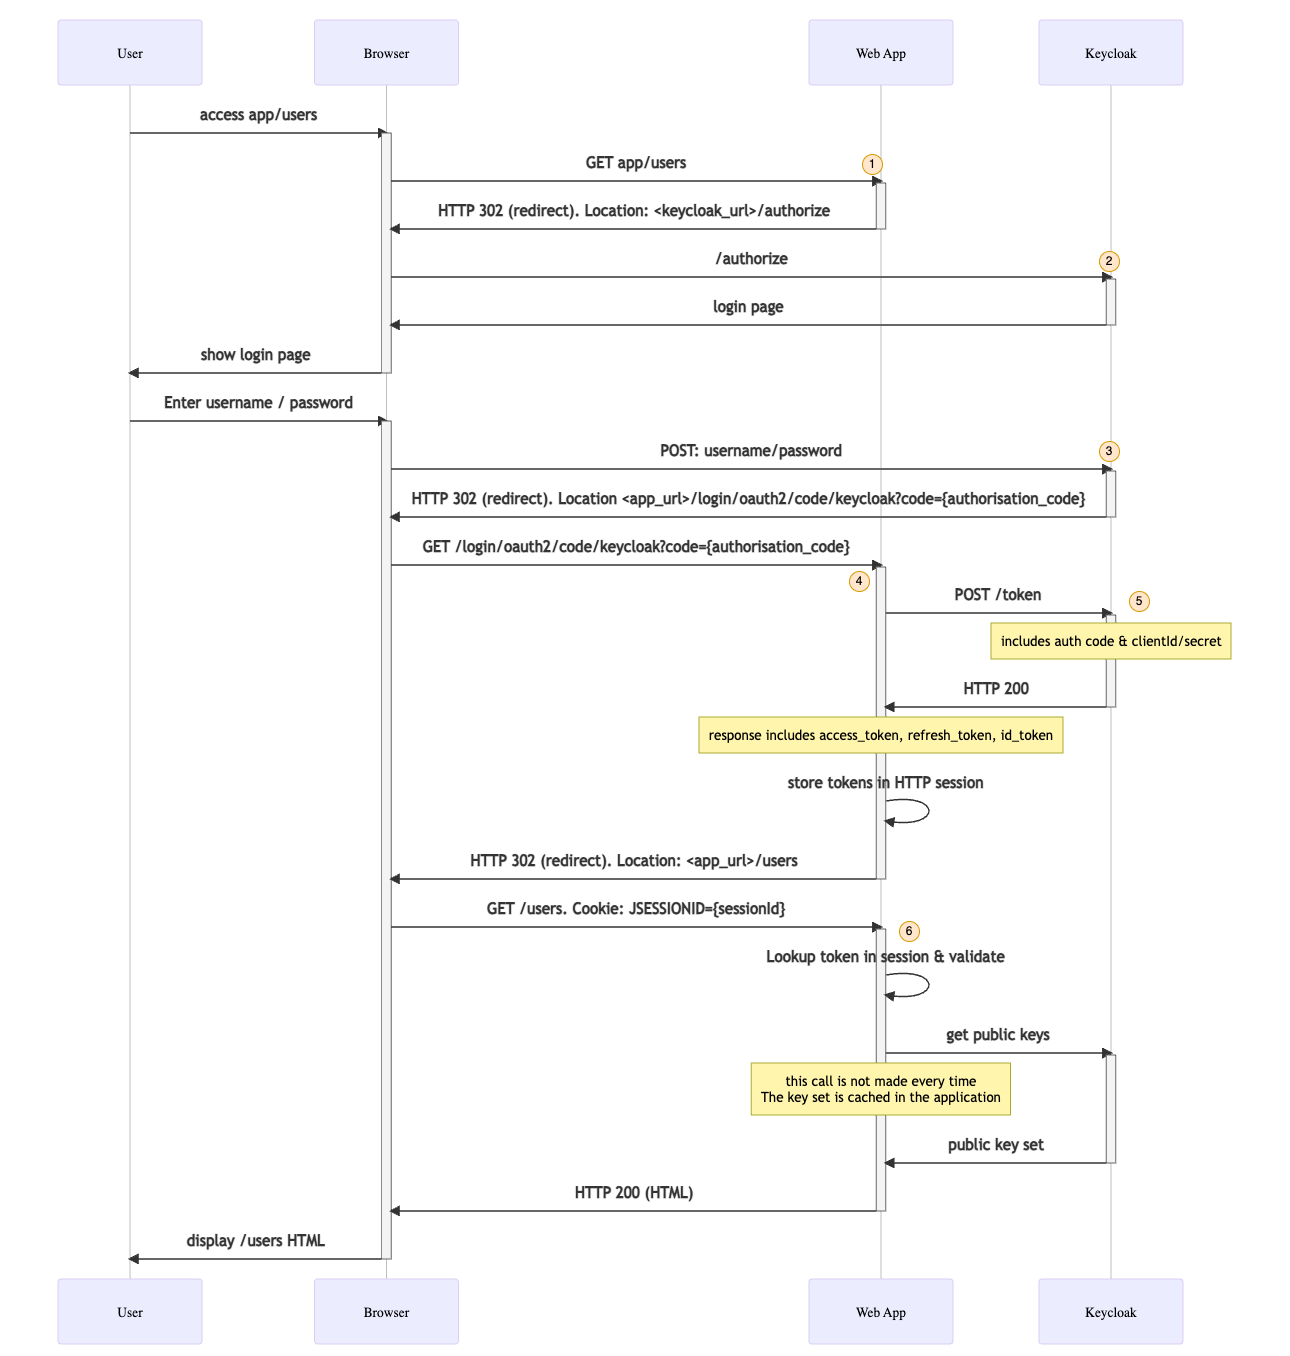
- Initial GET request to page
Request
Initially, the user’s browser makes a request to visit the /users page. Note there are no significant query params or HTTP headers present here. Also note that there is no session cookie sent across - this is the very first call to the application from the browser.
MethodGETURLhttp://localhost:8082/users
Response
Spring Security determines that there is no authenticated user (in fact there is no actual session at this point), and therefore issues a HTTP redirect to the Authorisation Server’s /authorize endpoint. The response will also set a session cookie containing the newly created session.
HTTP Response code302 (redirect)Location Headerhttp://localhost:8080/realms/lydtech/protocol/openid-connect/auth?response_type=code&client_id=lydtech-confidential-client&scope=openid&state=nxBN4MiRB5x9WWtjuuaLx8RrhLzACw6y5sdY67sq3V8%3D&redirect_uri=http://localhost:8082/login/oauth2/code/keycloak&nonce=4mypdrbx6zQEF7V_bkeahhWIzvW_hMHutufTS803F6MQuery ParamsSee the next section for a breakdown of the query params involvedHTTP HeadersSet-CookieJSESSIONID=73E0FBA5F46B8EB24E41A6FC787CEBEA; Path=/; HttpOnly
Note there is actually one more call involved here via a redirect but for brevity this has been omitted.
- Authorisation Request
Request
The browser now follows the redirect to the Authorisation server’s /authorize endpoint, i.e. step 1 of the 2-part Authorisation Code Grant type.
MethodGETURLhttp://localhost:8080/realms/lydtech/protocol/openid-connect/authQuery ParamValueDescriptionresponse_typecodeIndicates that we want to use the Authorisation Code Grantclient_idlydtech-confidential-clientThe client_id of the client previously created in KeycloakscopeopenidA single scope indicating we want to use OIDC to receive an ID token along with an access tokenstatenxBN4MiRB5x9WWtjuuaLx8RrhLzACw6y5sdY67sq3V8%3DA randomly generated value to help prevent CSRF attacks. This value will later be passed back to the client where it can validate that both state values match.redirect_urihttp://localhost:8082/login/oauth2/code/keycloakThis is an endpoint on our application that is made available by the Spring Security OAuth dependency in order to process callbacks from the Authorisation Server following successful authenticationnonce4mypdrbx6zQEF7V_bkeahhWIzvW_hMHutufTS803F6MA randomly generated value, this nonce will be present in the resulting token and can be used by the client to validate the token it later receives matches this authorisation request
Response
The response from Keycloak is a HTML page containing a login page with a username & password field and a ‘Log in’ button
HTTP Response Code200 OKResponse BodyHTML containing a login screen
- User authenticates with Keycloak
Request
The user types in their username & password then clicks Log In
MethodPOSTURLhttp://localhost:8080/realms/lydtech/login-actions/authenticateQuery ParamValueDescriptionsession_codeByBXc6Fa5NrgwwKDNZU_Mx-7yrQHXygBMWOW1tfeGmoKeycloak specific field. Not part of the OIDC/OAuth specsexecution4e660877-3b05-4f02-9271-46c467547f11Keycloak specific field. Not part of the OIDC/OAuth specsclient_idlydtech-confidential-clientID of the client we created in Keycloaktab_idsgh2Xs-mw5gKeycloak specific field. Not part of the OIDC/OAuth specsBody KeyBody ValueDescriptionusernameadmin@example.comAdmin user username we created in Keycloakpasswordsecret123Admin user password we created in Keycloak
Response
Upon a successful log in, Keycloak redirects back to our application as we requested via the redirect_uri
HTTP Response Code302 (redirect)Location Headerhttp://localhost:8082/login/oauth2/code/keycloak?state=nxBN4MiRB5x9WWtjuuaLx8RrhLzACw6y5sdY67sq3V8%3D&session_state=f6fa8a99-241f-4d6a-8cbe-b838f6f505c7&code=0f8ac7d3-0d3b-450e-b7f4-e34e1973ad68.f6fa8a99-241f-4d6a-8cbe-b838f6f505c7.36cf512c-fb46-4763-acf3-79653c0b064eThe URL for an endpoint made available in our app by Spring Security with a set of OAuth related query parameters, including the authorisation codeQuery ParamsSee next request for Query Param breakdown
- Redirect back to app following successful authentication
Request
The browser follows the redirect back to the Spring Boot application, to an endpoint that is made available by Spring security for the purpose of processing these callbacks
MethodGETURLhttp://localhost:8082/login/oauth2/code/keycloakQuery ParamValueDescriptionstatenxBN4MiRB5x9WWtjuuaLx8RrhLzACw6y5sdY67sq3V8%3DThe same state value that the application created before making the /authorize call to the Auth Serversession_statef6fa8a99-241f-4d6a-8cbe-b838f6f505c7a salted cryptographic hashcode0f8ac7d3-0d3b-450e-b7f4-e34e1973ad68.f6fa8a99-241f-4d6a-8cbe-b838f6f505c7.36cf512c-fb46-4763-acf3-79653c0b064eThe authorisation code issued by Keycloak. This will be exchanged for an access token.HTTP Header NameValueDescriptionCookieJSESSIONID=73E0FBA5F46B8EB24E41A6FC787CEBEAThe browser will always send the Cookie header that it has stored for this domain
Response
The eventual response will redirect the browser back to the page the user wanted in the first place (/users in this case). This only happens after an OAuth token has been successfully generated (see step 5 below)
HTTP Response Code302 (redirect)Location Headerhttp://localhost:8082/usersURL that the user originally wanted to accessHTTP Header NameHTTP Header ValueDescriptionSet-CookieJSESSIONID=E2843C84852FFC4EA35C3E29CBA60E4C; Path=/; HttpOnlyThe server has issued a new Session ID now that the user is successfully authenticated
- Token request
Request
The Spring Boot application makes the /token call to the Authorisation Server in order to exchange the authorisation code for an access token, i.e. step 2 of the 2-part Authorisation Code Grant type
MethodPOSTURLhttp://localhost:8080/realms/lydtech/protocol/openid-connect/tokenBody KeyBody ValueDescriptiongrant_typecodeIndicates that we are using the authorisation code grant typecode0f8ac7d3-0d3b-450e-b7f4-e34e1973ad68.f6fa8a99-241f-4d6a-8cbe-b838f6f505c7.36cf512c-fb46-4763-acf3-79653c0b064eThe authorisation code issued as part of the /authorisation call by the Authorisation Serverredirect_urihttp://localhost:8082/login/oauth2/code/keycloakNot used as part of this callHTTP Header NameValueDescriptionAuthorizationBasic bHlkdGVjaC1jb25maWRlbnRpYWwtY2xpZW50OmhaVWRCSXNFNkw2ZGZPdTVRZm5RYmJ1MjFkMDBVSFpEBase64 encoded value of ‘<client_id>:<client_secret>’. I.e. this in our case: ‘lydtech-confidential-client:hZUdBIsE6L6dfOu5QfnQbbu21d00UHZD’The secret is required here because the client is ‘confidential’. This is only appropriate because this call happens on a private channel (between the Spring Boot backend and the Authorisation Server). See the configuration file above for where this client_secret value is stored in the code
Response
This includes an access token, refresh token and (because we requested the oidc scope) an ID token (all in the form of JWT tokens). Note the access tokens have been truncated for readability. They are included in full below.
HTTP Response Code200 (OK)Body KeyBody ValueDescriptionaccess_tokeneyJ..._1qw (truncated)Access token in the form of a JWT. Signed by the Authorisation Server.expires_in300Number of seconds that the access token is valid for (5 minutes in this case). Note the actual expiry time is in the access_token JWT itself.id_tokeneyJ...paYA (truncated)An OIDC ID token in the form of a JWT. May contain extra claims about the user's identity other than name and email address.not-before-policy0Can be used to indicate a not-before-policyrefresh_expires_in1800Number of seconds that this refresh token is valid for (30 minutes in this case)refresh_tokeneyJ...SoKns (truncated)Can be used to exchange for a new access_token via the Authorisation Server’s /token endpoint. This is typically used once the access_token expires and avoids the user re-authenticating every 5 minutes.scopeopenid, email, profileDefault OIDC scopes configured in the Authorisation Server. Could contain more OAuth scopes if these were requested at the authorisation stage.session_statef6fa8a99-241f-4d6a-8cbe-b838f6f505c7Indicates the Keycloak sessiontoken_typeBearerIndicates that this token can be used as a bearer token.
Note you could copy any of these tokens into jwt.io to view the full contents.
access_token
eyJhbGciOiJSUzI1NiIsInR5cCIgOiAiSldUIiwia2lkIiA6ICJqanoyd0ZEVXhzUGdZYWowcV9FbzUtdEgxWlAzMldwMldNdDltY3RCal9RIn0.eyJleHAiOjE2ODU5ODQ0NjUsImlhdCI6MTY4NTk4NDE2NSwiYXV0aF90aW1lIjoxNjg1OTg0MTY1LCJqdGkiOiJlMTgwN2E5MS0xMDk3LTRmZGEtYjQ3Yi1lNGFmNDk0MmIwNzkiLCJpc3MiOiJodHRwOi8vbG9jYWxob3N0OjgwODAvcmVhbG1zL2x5ZHRlY2giLCJhdWQiOiJhY2NvdW50Iiwic3ViIjoiYmRiOWY5ZWYtOWJlNy00Mzc2LTk5NjQtYzQwYzQzOTRkZjQ3IiwidHlwIjoiQmVhcmVyIiwiYXpwIjoibHlkdGVjaC1jb25maWRlbnRpYWwtY2xpZW50Iiwibm9uY2UiOiI0bXlwZHJieDZ6UUVGN1ZfYmtlYWhoV0l6dldfaE1IdXR1ZlRTODAzRjZNIiwic2Vzc2lvbl9zdGF0ZSI6ImY2ZmE4YTk5LTI0MWYtNGQ2YS04Y2JlLWI4MzhmNmY1MDVjNyIsImFjciI6IjEiLCJhbGxvd2VkLW9yaWdpbnMiOlsiIl0sInJlYWxtX2FjY2VzcyI6eyJyb2xlcyI6WyJkZWZhdWx0LXJvbGVzLWx5ZHRlY2giLCJvZmZsaW5lX2FjY2VzcyIsInVtYV9hdXRob3JpemF0aW9uIiwidXNlciJdfSwicmVzb3VyY2VfYWNjZXNzIjp7ImFjY291bnQiOnsicm9sZXMiOlsibWFuYWdlLWFjY291bnQiLCJtYW5hZ2UtYWNjb3VudC1saW5rcyIsInZpZXctcHJvZmlsZSJdfX0sInNjb3BlIjoib3BlbmlkIGVtYWlsIHByb2ZpbGUiLCJzaWQiOiJmNmZhOGE5OS0yNDFmLTRkNmEtOGNiZS1iODM4ZjZmNTA1YzciLCJlbWFpbF92ZXJpZmllZCI6dHJ1ZSwibmFtZSI6IkpvaG4gSm9zZXBoIiwicHJlZmVycmVkX3VzZXJuYW1lIjoidXNlckBleGFtcGxlLmNvbSIsImdpdmVuX25hbWUiOiJKb2huIiwiZmFtaWx5X25hbWUiOiJKb3NlcGgiLCJlbWFpbCI6InVzZXJAZXhhbXBsZS5jb20ifQ.yre6-Qz0HSEDO4o6W26vwO9hZdl0V4-JpJF9wTzXfLjBqmC44MZLqmkex__sAYgSUcbZoOvpKrVb0BCoaHdCbvt27oxA-EVa-ugXTphyy7Oes0VmHBljzg-ZoH-hMBVbUQyA9ZUHlsFX_vEueQI1mFMBrb1MPR77sCz-ZuIaKRamKZFIaAb5X3fpIl7uLL9Y0Lwfx0_wKPN3kQ6TyP3vNkF8f4y0tHf0deBzwBuNHW29D9SMfxK9qGk0jQWxz3SA312TlMaAV0JVC06dAG8RfKs0AgWS9QREjvTrT2SKiRqa51YqBIZMwPaaehe3I7NI0xspHGlBlQf4rfEzCi_1qw
id_token
eyJhbGciOiJSUzI1NiIsInR5cCIgOiAiSldUIiwia2lkIiA6ICJqanoyd0ZEVXhzUGdZYWowcV9FbzUtdEgxWlAzMldwMldNdDltY3RCal9RIn0.eyJleHAiOjE2ODU5ODQ0NjUsImlhdCI6MTY4NTk4NDE2NSwiYXV0aF90aW1lIjoxNjg1OTg0MTY1LCJqdGkiOiIxNDg5MDZlMi02NDA4LTQwNTAtODI5Yi1jYjQ5M2I1OWI1OGUiLCJpc3MiOiJodHRwOi8vbG9jYWxob3N0OjgwODAvcmVhbG1zL2x5ZHRlY2giLCJhdWQiOiJseWR0ZWNoLWNvbmZpZGVudGlhbC1jbGllbnQiLCJzdWIiOiJiZGI5ZjllZi05YmU3LTQzNzYtOTk2NC1jNDBjNDM5NGRmNDciLCJ0eXAiOiJJRCIsImF6cCI6Imx5ZHRlY2gtY29uZmlkZW50aWFsLWNsaWVudCIsIm5vbmNlIjoiNG15cGRyYng2elFFRjdWX2JrZWFoaFdJenZXX2hNSHV0dWZUUzgwM0Y2TSIsInNlc3Npb25fc3RhdGUiOiJmNmZhOGE5OS0yNDFmLTRkNmEtOGNiZS1iODM4ZjZmNTA1YzciLCJhdF9oYXNoIjoia0FhUDExdWRyelN3bmdON1hlREE0dyIsImFjciI6IjEiLCJzaWQiOiJmNmZhOGE5OS0yNDFmLTRkNmEtOGNiZS1iODM4ZjZmNTA1YzciLCJlbWFpbF92ZXJpZmllZCI6dHJ1ZSwibmFtZSI6IkpvaG4gSm9zZXBoIiwicHJlZmVycmVkX3VzZXJuYW1lIjoidXNlckBleGFtcGxlLmNvbSIsImdpdmVuX25hbWUiOiJKb2huIiwiZmFtaWx5X25hbWUiOiJKb3NlcGgiLCJlbWFpbCI6InVzZXJAZXhhbXBsZS5jb20ifQ.0gimss-xxTOzGnmTFMx-DvX3JtyJAFvAwoevXI8KNZ8tXW7_r1Giw2nHPEHghLN4-b70JP2DQSD5q3NnjUqz5CcHyTy60FUhB-Z4S_tXcouMbQ8zENYRxLgwWExb2qYWgyviJB2FxNO1Gn1aJw_bAuEDF4DVAeaNn9j597fDLe1z2tgkQQdMqMwYrIqSLGj_X3oLVjY7zZtXMgHwlDTu2dmcwSsTpUvywT5adpWGd0Jrkx4X5Viy0nhLNs9_7qCiYpNh4x_p1LX4q3PYdsMZTPGCjJHgjoV2W49LOj7WPBoxusFPrpiQfDwLMh8W513hh4DnWto0zJROZRvV24paYA
refresh_token
eyJhbGciOiJIUzI1NiIsInR5cCIgOiAiSldUIiwia2lkIiA6ICJiYWI2ZTA3NS00NzZhLTRlZTktOWZkMC1mZjJiM2MyM2FkNzMifQ.eyJleHAiOjE2ODU5ODU5NjUsImlhdCI6MTY4NTk4NDE2NSwianRpIjoiOTY4NzdkMmMtMGI1Zi00NTA3LThlOTUtMDQyY2M4ODU4NGI4IiwiaXNzIjoiaHR0cDovL2xvY2FsaG9zdDo4MDgwL3JlYWxtcy9seWR0ZWNoIiwiYXVkIjoiaHR0cDovL2xvY2FsaG9zdDo4MDgwL3JlYWxtcy9seWR0ZWNoIiwic3ViIjoiYmRiOWY5ZWYtOWJlNy00Mzc2LTk5NjQtYzQwYzQzOTRkZjQ3IiwidHlwIjoiUmVmcmVzaCIsImF6cCI6Imx5ZHRlY2gtY29uZmlkZW50aWFsLWNsaWVudCIsIm5vbmNlIjoiNG15cGRyYng2elFFRjdWX2JrZWFoaFdJenZXX2hNSHV0dWZUUzgwM0Y2TSIsInNlc3Npb25fc3RhdGUiOiJmNmZhOGE5OS0yNDFmLTRkNmEtOGNiZS1iODM4ZjZmNTA1YzciLCJzY29wZSI6Im9wZW5pZCBlbWFpbCBwcm9maWxlIiwic2lkIjoiZjZmYThhOTktMjQxZi00ZDZhLThjYmUtYjgzOGY2ZjUwNWM3In0.e-rF7pKug9iASUgqfopo07hmCau4JB8tMF-qz_SoKns
- Authenticated request to application
Request
The browser can now follow the final redirect (from step 4) to request the page that the user originally requested. The Session ID cookie is sent across which allows the access_token to be looked up in the HTTP session and verified
MethodGETURLhttp://localhost:8082/usersHTTP Header NameHTTP Header ValueDescriptionCookieJSESSIONID=E2843C84852FFC4EA35C3E29CBA60E4CThe Session ID that will be used to obtain the users access token
Response
The /users HTML is now returned successfully so that the Browser can show it to the user
HTTP Response Code200 OKResponse BodyHTML of the /users page
Note there are additional calls that were omitted here for brevity such as the call to the Authorisation Server to get the public key sets that it can use to sign tokens, and the calls to the OIDC endpoint /userInfo which is made from the Web application to the Authorisation Server.
Summary
This article builds upon previous articles in this series to show how a ‘confidential’ client can be used. It created a Spring Boot app in the form of a traditional web application that creates the HTML pages on the server and returns them to the browser to display. It showed how the use of HTTP sessions can be used to allow the server side application itself to be the OAuth client.
We built upon the theory from Part 1, and showed this application working with the Keycloak Authorisation Server from Part 2. We followed this version of the Authorisation Code Grant flow step by step to illustrate the differences with how a public OAuth client behaves (Part 2).
All the code is available in the following Github repository:
As an extension to this series, Part 4 looks at replacing the Keycloak Authorisation Server with a custom Authorisation Server created using the Spring Authorisation Server project that was mentioned in Part 2 when providing the history on OAuth support in Spring.