Part 2: A public client - REST API and SPA app
Introduction
This is the second article in this series. Part 1 was a primer to the world of Authentication and Authorisation and introduced the important concepts that need to be understood before exploring in more detail. This article puts these concepts into action and shows how you can apply these to achieve Authentication and Authorisation in a sample application.
The article concentrates on a ‘public’ OAuth client. This is where the client itself has no way of reliably storing OAuth related secrets such as the client_secret field. Think of a Single Page Application (SPA) written in React or similar - there is no secure way to store a sensitive field here as the Javascript / TypeScript code is always available to the user in the browser. The diagram below illustrates the parts of this architecture:
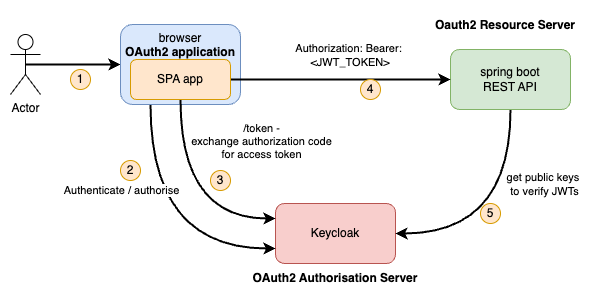
This article will work through the following
- Choose an Authorisation Server
- Configure the Authorisation Server with users, roles and an OAuth client
- Create a Resource Server to expose a REST API for the client to consume
- Create a Single Page Application (SPA) as the OAuth client
- Show how all the moving parts are wired together to provide authentication and authorisation via OIDC / OAuth2
Part 3 of this series looks at a ‘confidential’ OAuth client, in the form of a traditional server side web application.
Choosing an Authorisation Server
Previously, Spring offered support for all things OAuth, including support for creating Authorisation Servers and Resource Servers, via the spring-security-oauth library. This has now been deprecated, with OAuth support moving into the Spring Security Library itself. Note that Spring Security does not include support for creating custom Authorisation Servers due to the existence of a large number of specialised OAuth/OIDC compliant Authorisation Server products. Although, recently, Spring has introduced a new Spring Authorisation Server project to support the creation of custom Authorisation Servers again for the use cases that require that. This is explored in Part 4 of this series.
The Authorisation Server component plays a key role in the security of any architecture leveraging OIDC / OAuth. It will typically be responsible for storing user details and credentials, roles, groups and other information and be responsible for authenticating users. It is a crucial piece and it is imperative that this is done correctly. With this in mind, the industry has generally moved towards using specialist identity products such as Auth0, Keycloak, AWS Cognito, Firebase Authentication as Authorisation Servers rather than using tools such as Spring to create custom implementations.
For this series, Keycloak has been used for the Authorisation Server. The main reasons for this are:
- It is a well known, mature product
- Has very good documentation and support community
- Is very easy to run locally using Docker
Setting up Keycloak
Note the steps below are for running an Authorisation Server locally in the interest of demonstrating the concepts in this series of articles. In order to run in production, consult the Keycloak documentation.
Start Keycloak
Use the following command to run Keycloak locally using Docker
docker run -p 8080:8080 -e KEYCLOAK_ADMIN=admin -e KEYCLOAK_ADMIN_PASSWORD=admin quay.io/keycloak/keycloak:21.1.1 start-dev
Create Realm
The Keycloak instance will have a default realm of ‘master’. The first step is to create a realm. A realm is a space where you manage objects, including users, applications, roles, and groups. A user belongs to and logs into a specific realm.
Once logged in to the admin console at http://localhost:8080/admin as the admin user (password: admin), you will see a drop down box in the top left corner to select a realm. The master realm will currently be selected. Drop the box down and click ‘Create Realm’. Choose a Realm name that is relevant to your situation. We’ll use ‘lydtech’ - our organisation name.
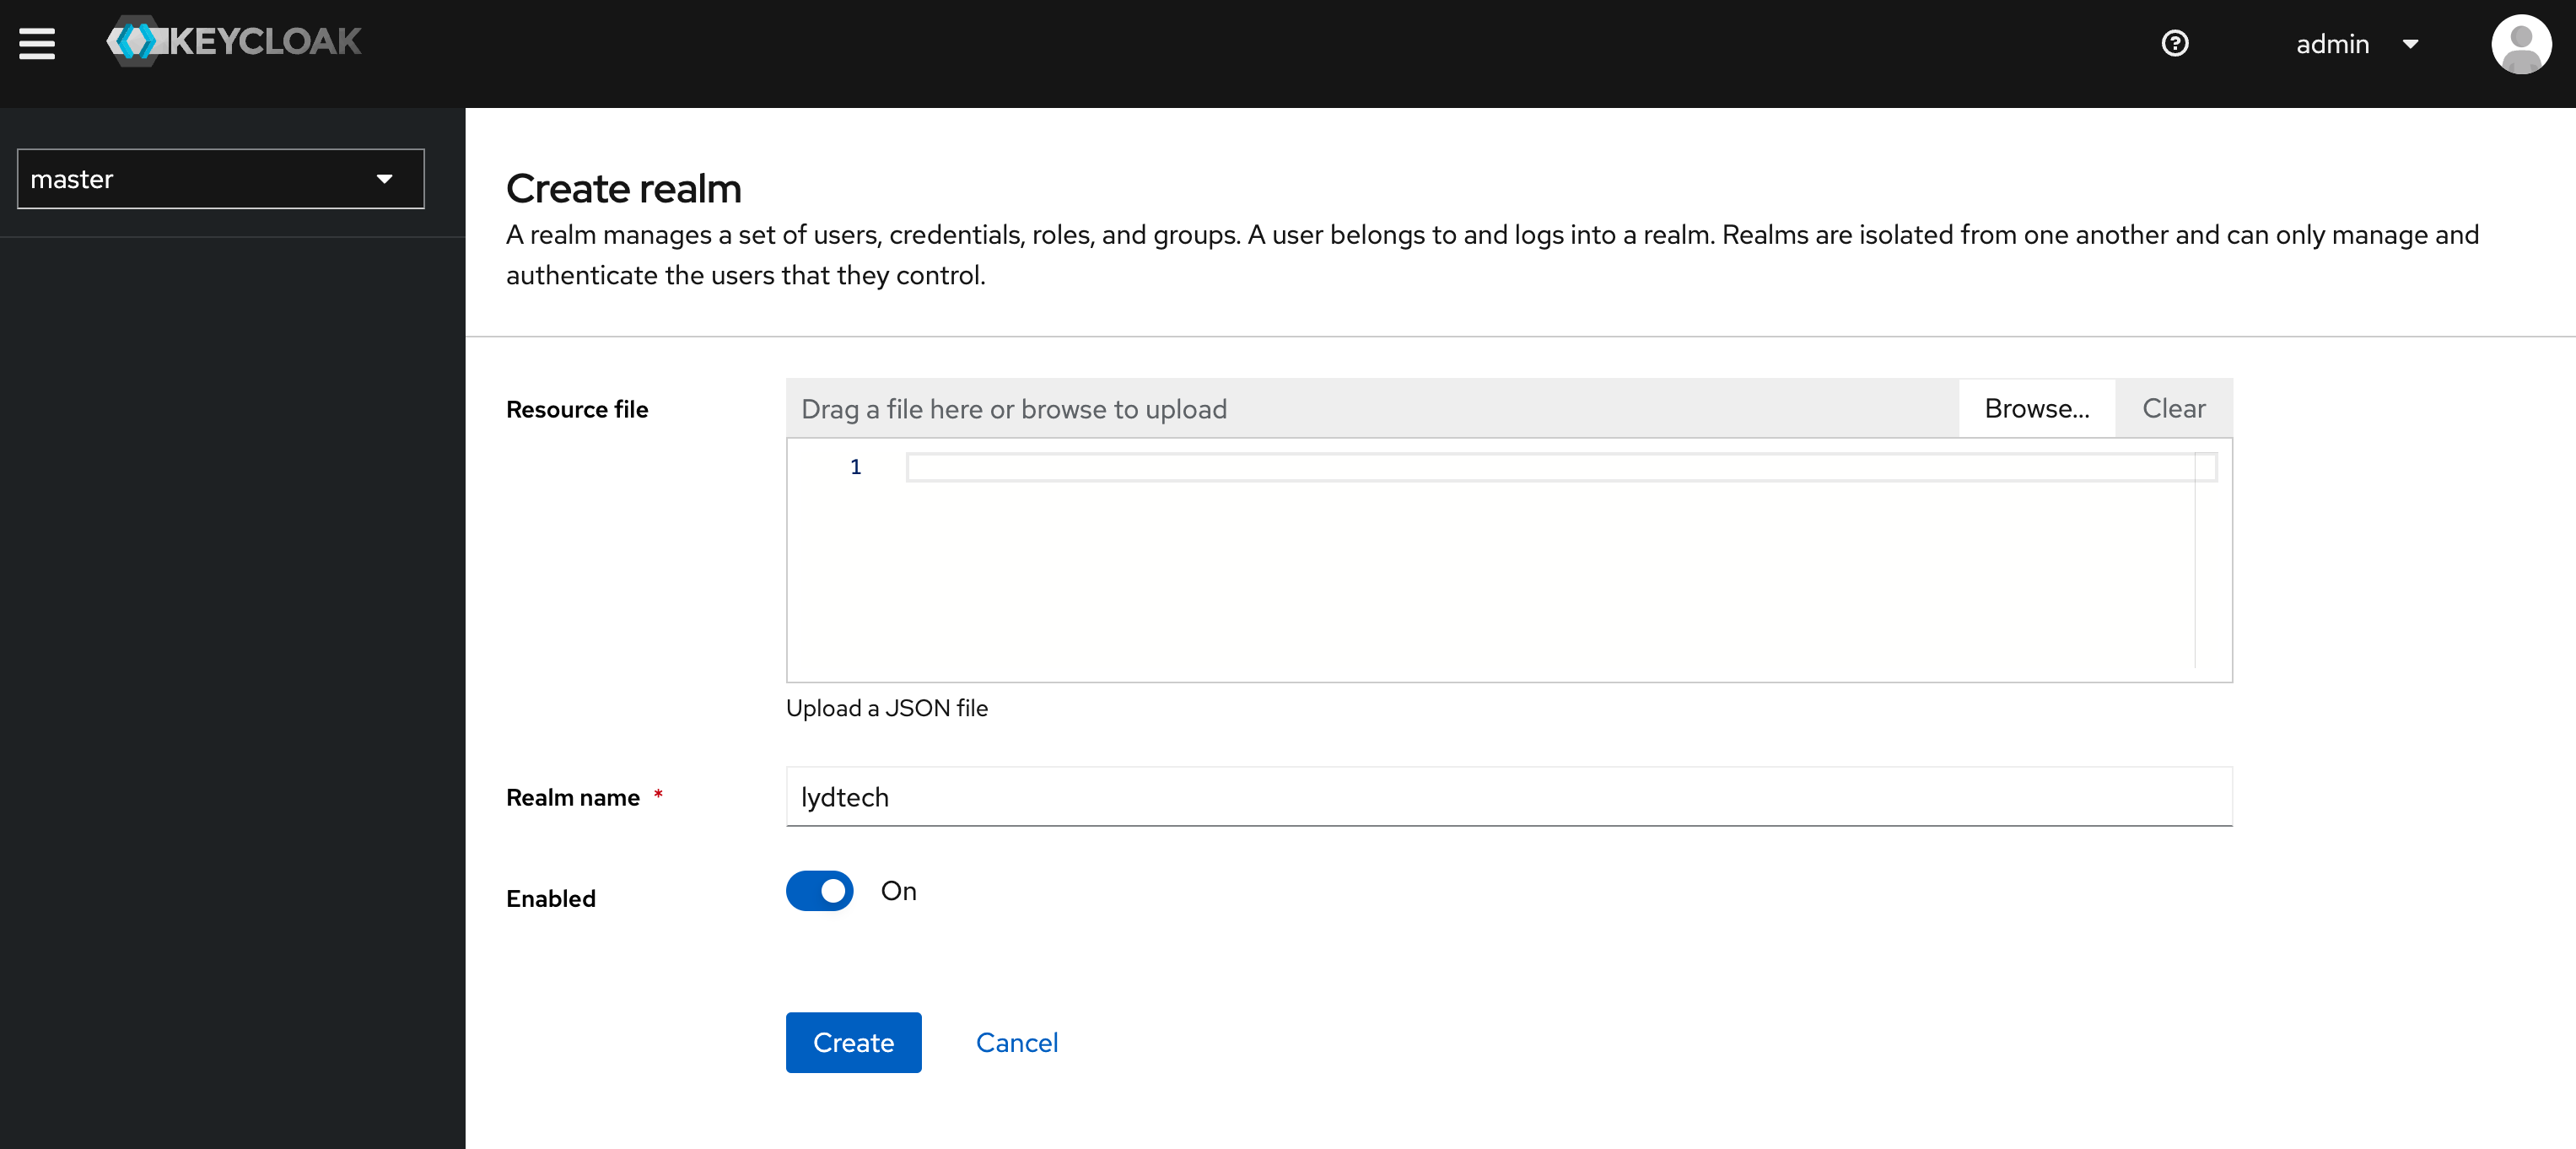
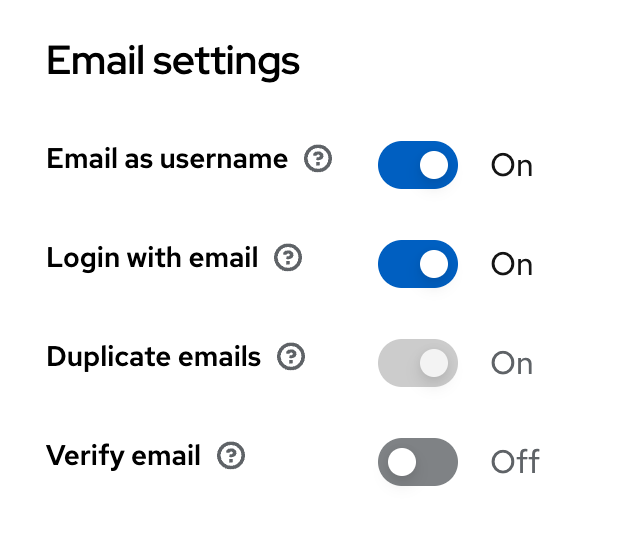
Once the new realm is selected there are many configuration options that can be changed. To help simplify this demo, navigate to ‘Realm Settings->Login->Email Settings’ and ensure ‘Email as username’ is enabled. Your settings should look as follows
Create Roles
Now that we have a Realm, we need to create 2 roles. We will create an ‘admin’ and ‘user’ role in order to demonstrate authorisation in action.
Navigate to ‘Realm Roles’ and click ‘Create role’. Enter the name ‘admin’ and an optional description.
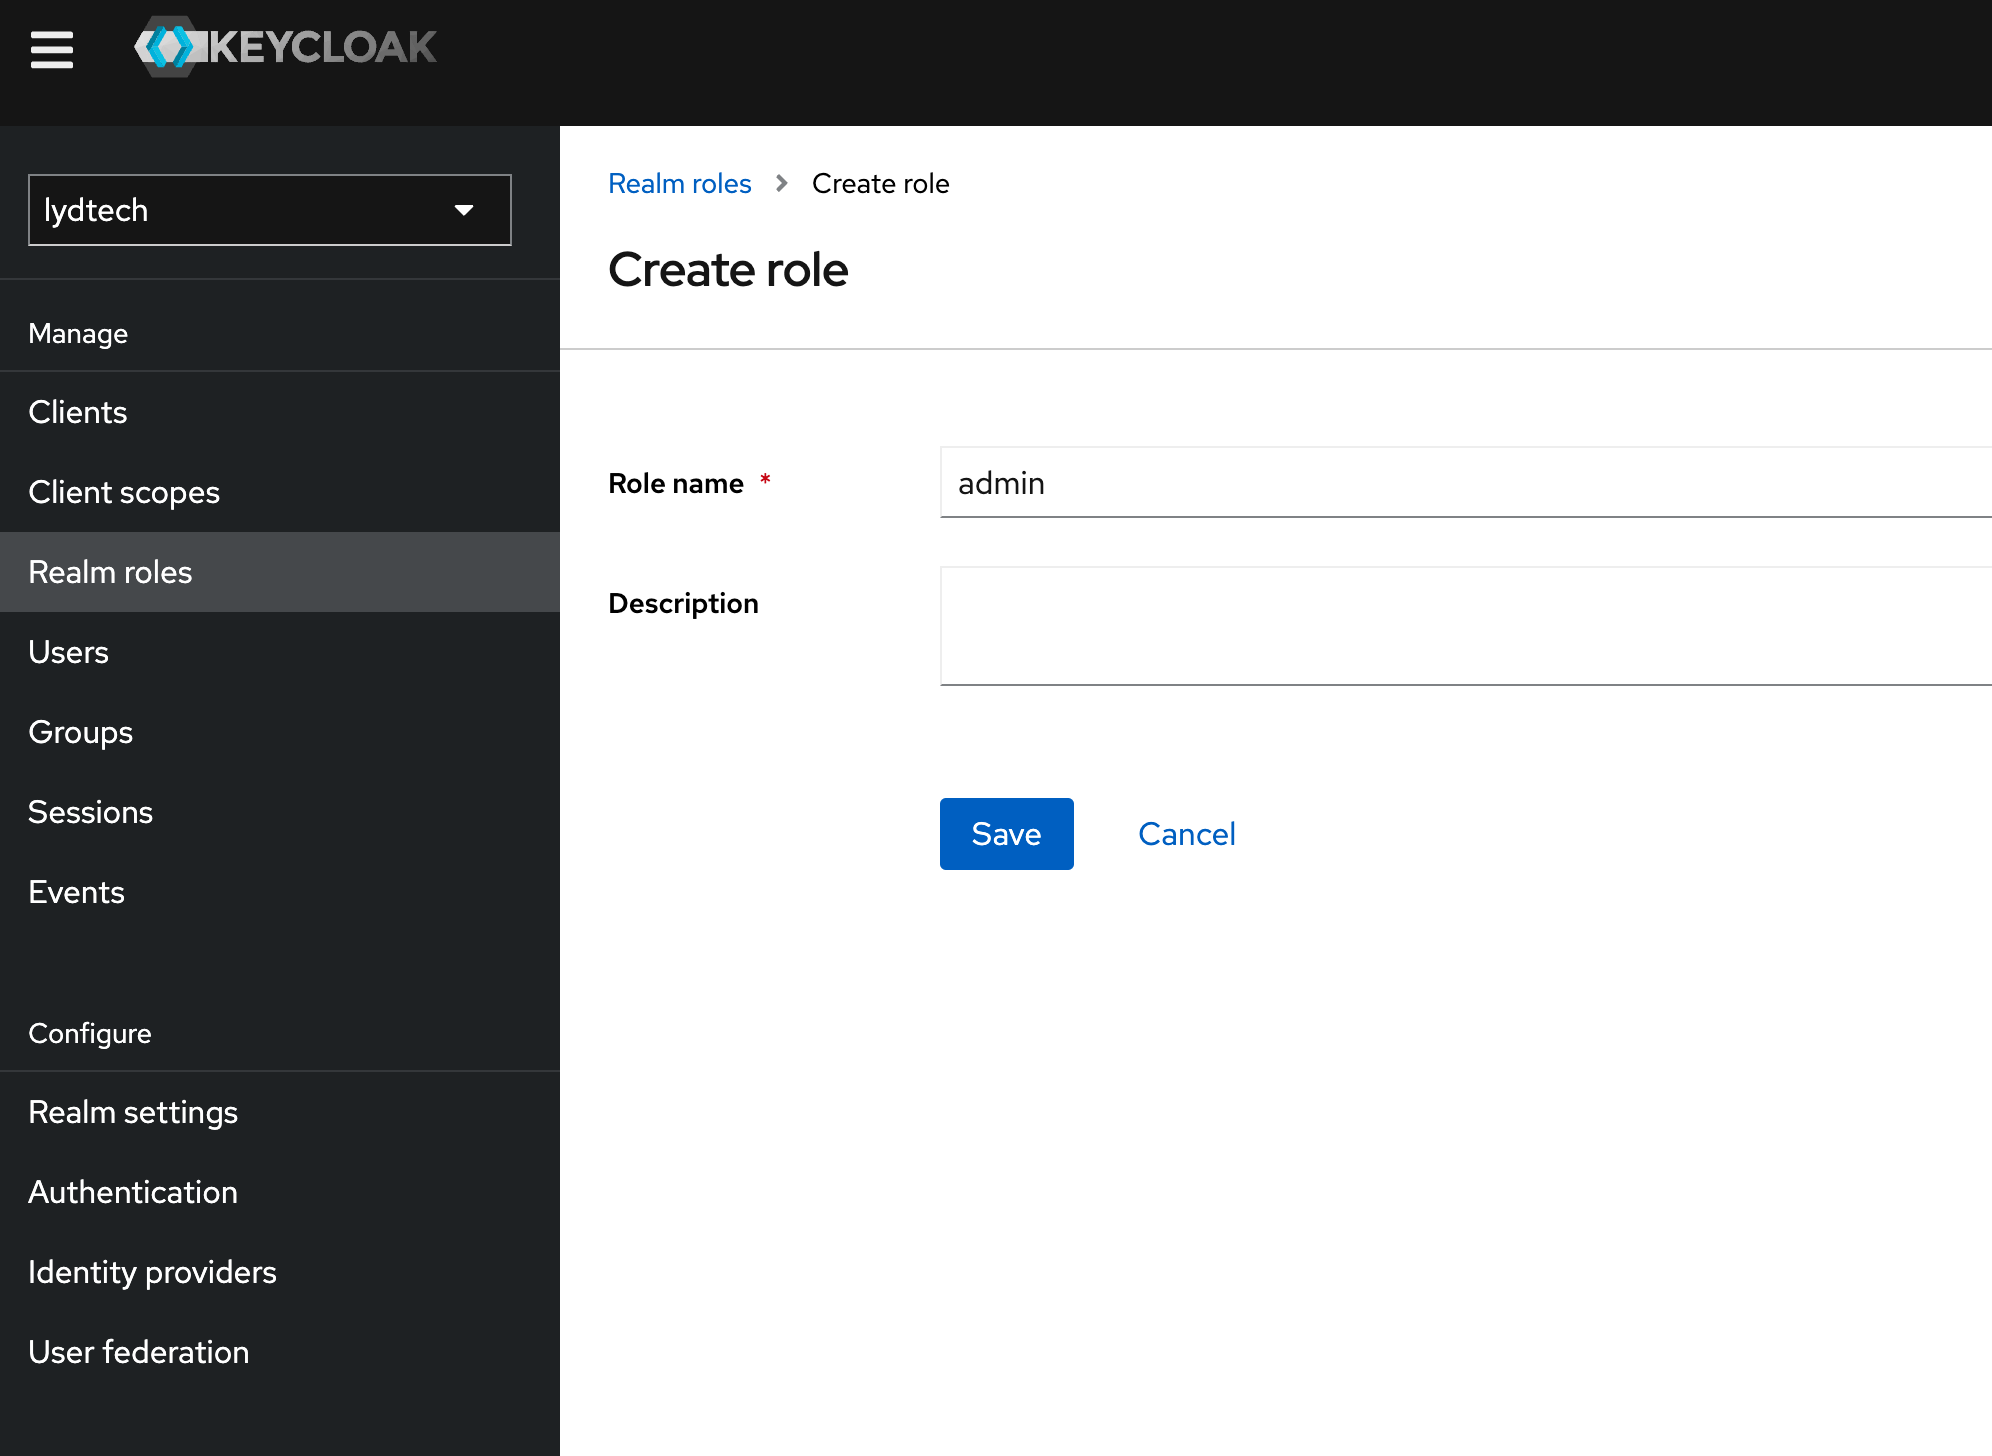
Click Save. Your new role will be created and will now be visible on screen.
Repeat this process to add a ‘user’ role.
Create Users
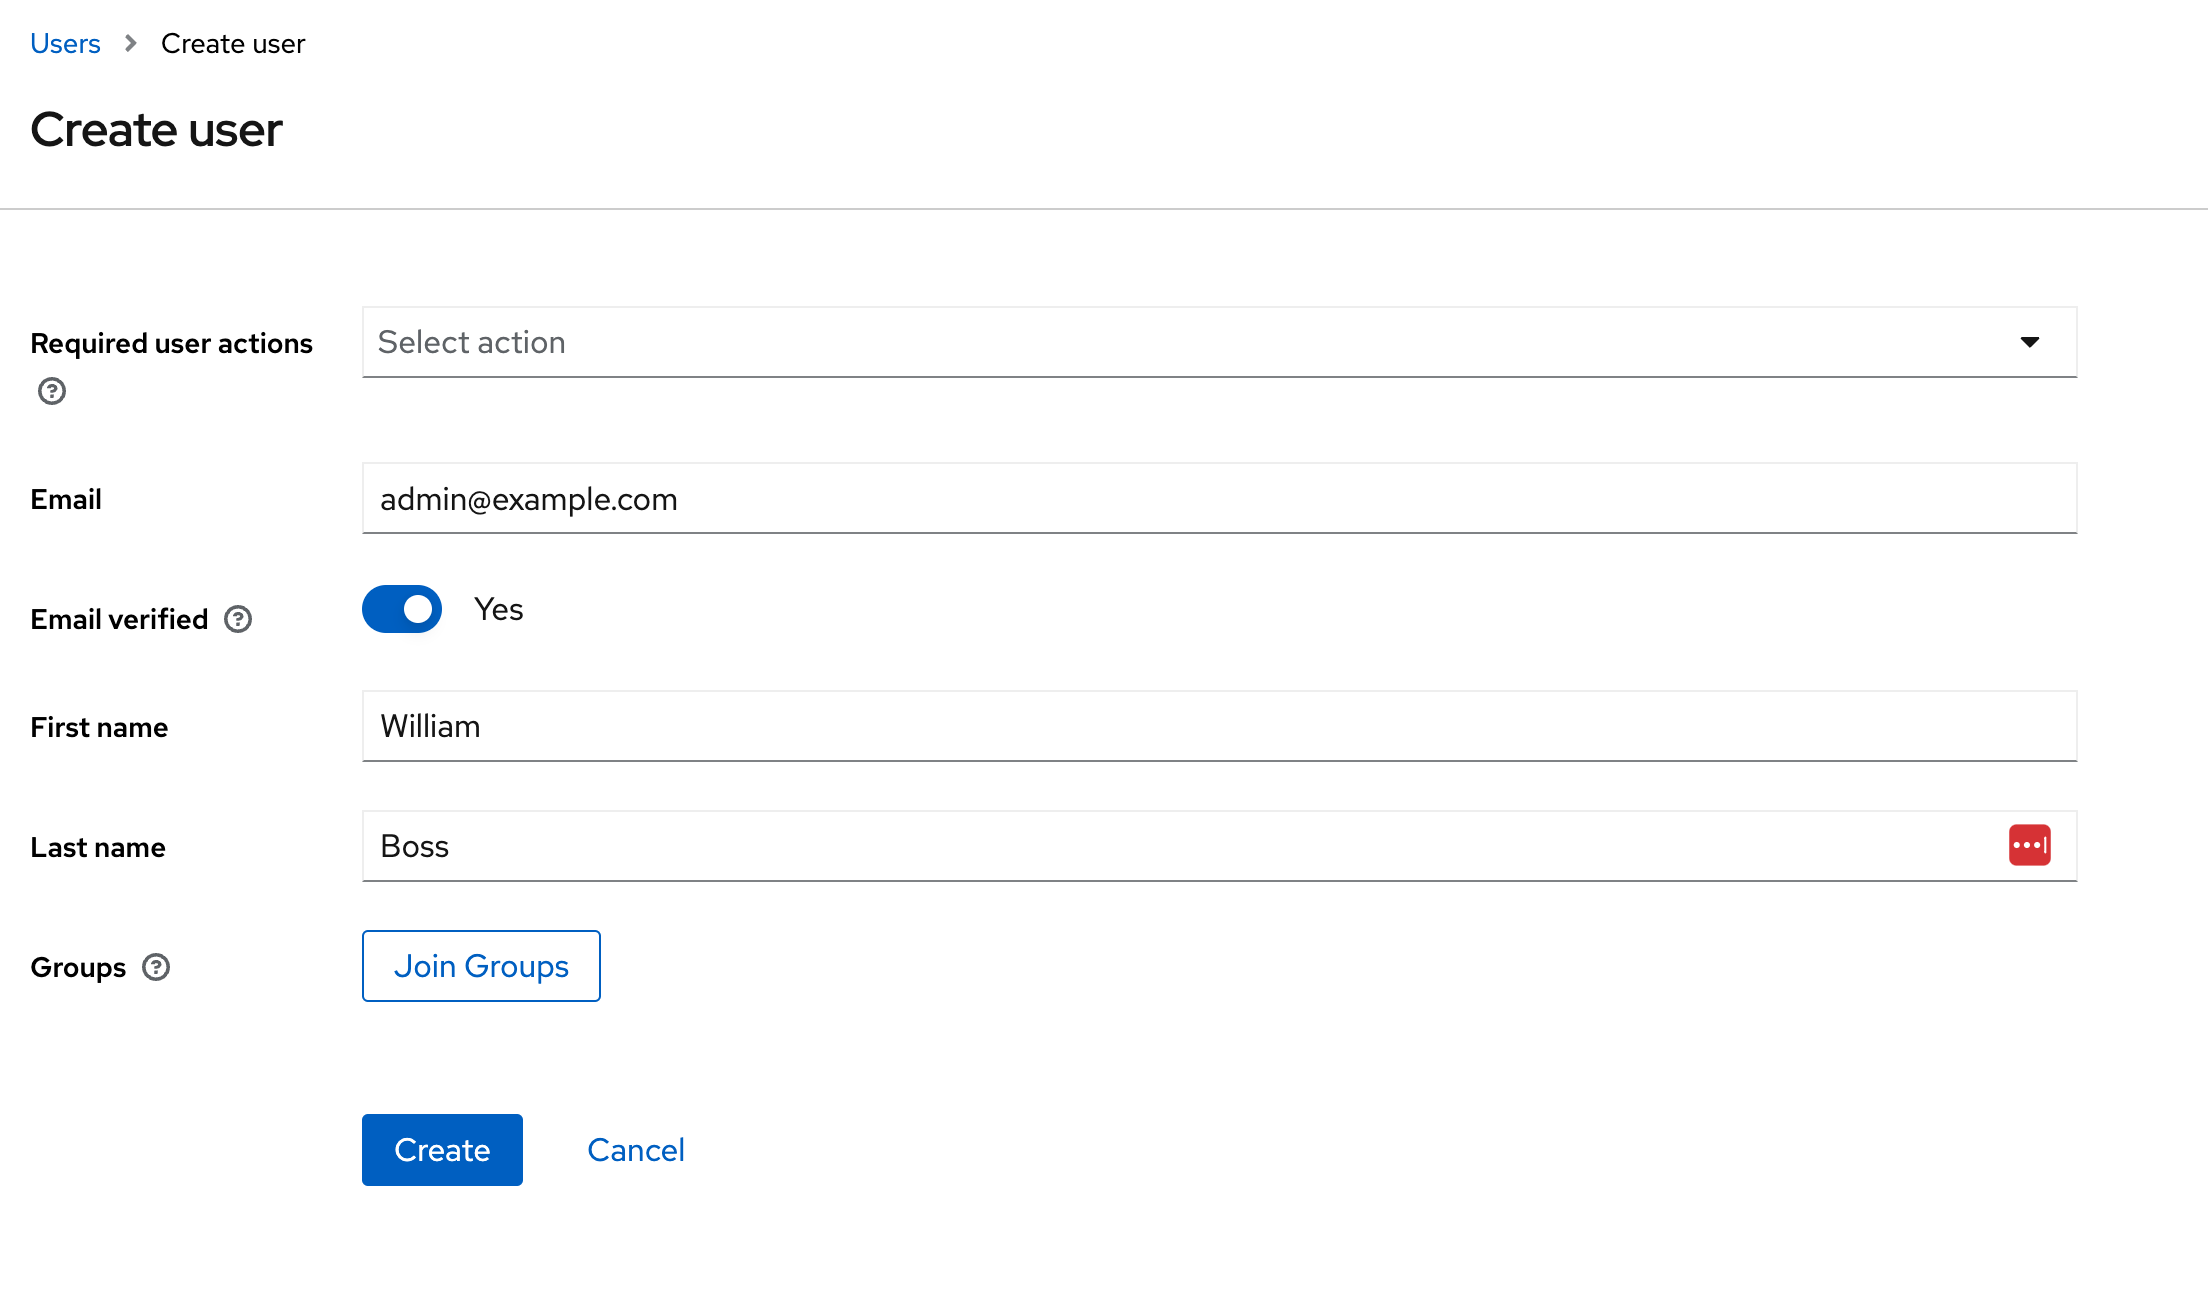
Next, let's create 2 users with the relevant roles. Navigate to ‘Users’ and click ‘Create new user’. Enter the email ‘admin@example.com’, ensure ‘Email Verified’ is enabled (to avoid the user needing to verify their email) and choose an appropriate First / Last name as shown below
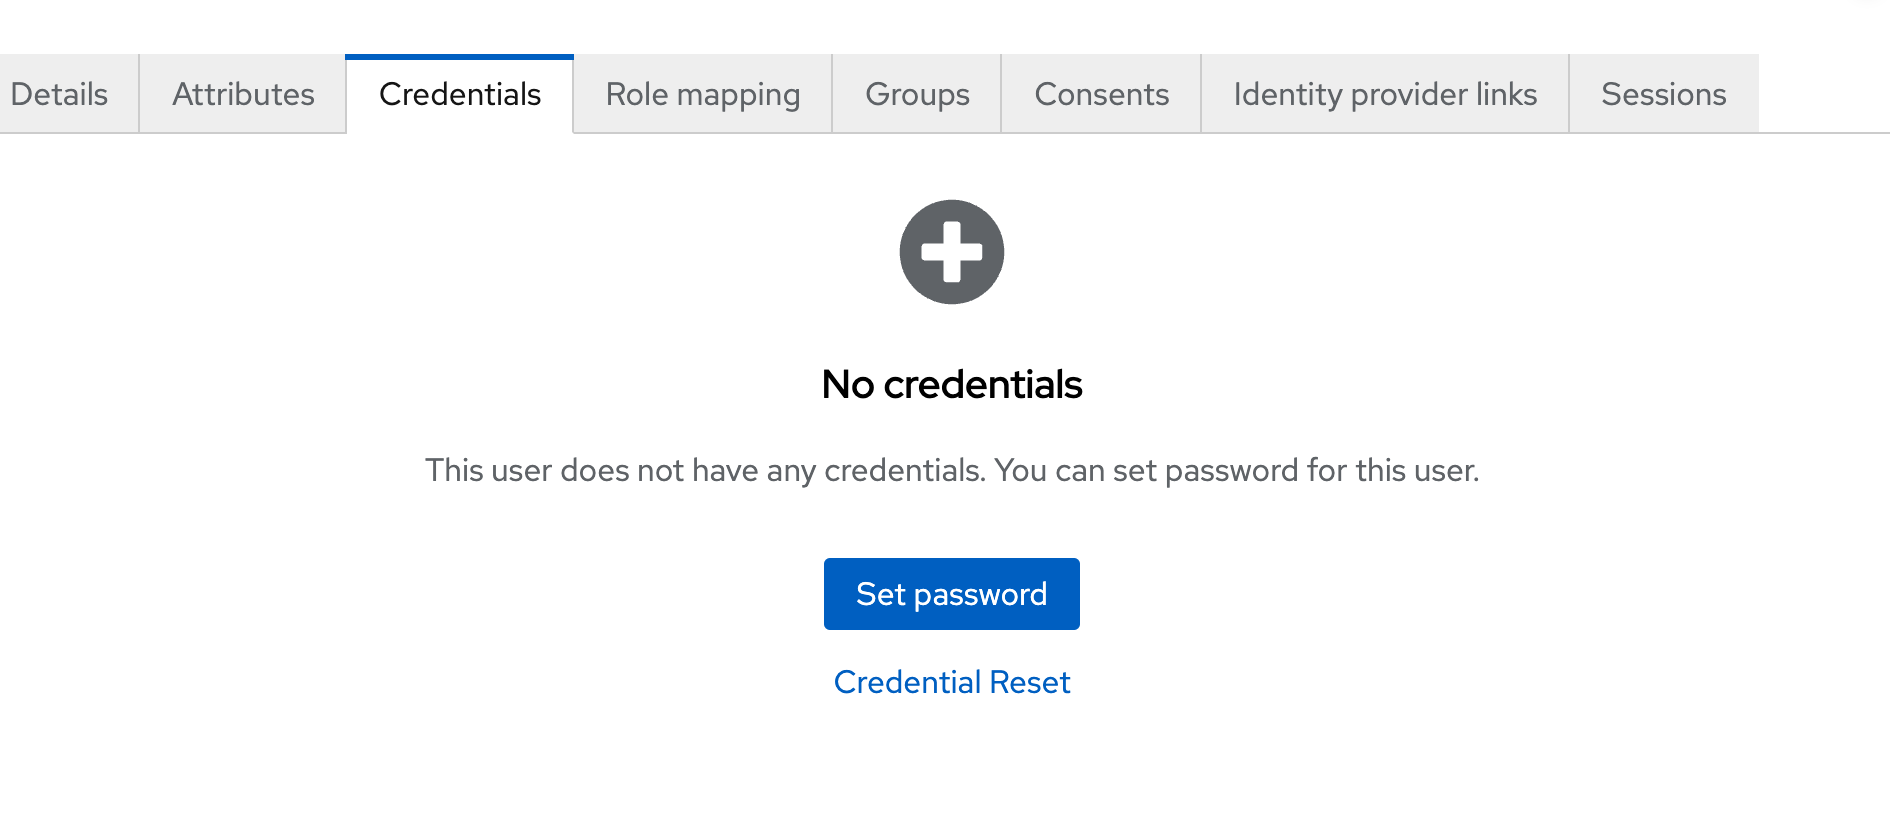
The user needs a password. We will set this in the admin console. With the new user selected, visit the ‘Credentials’ tab, click ‘Set Password’
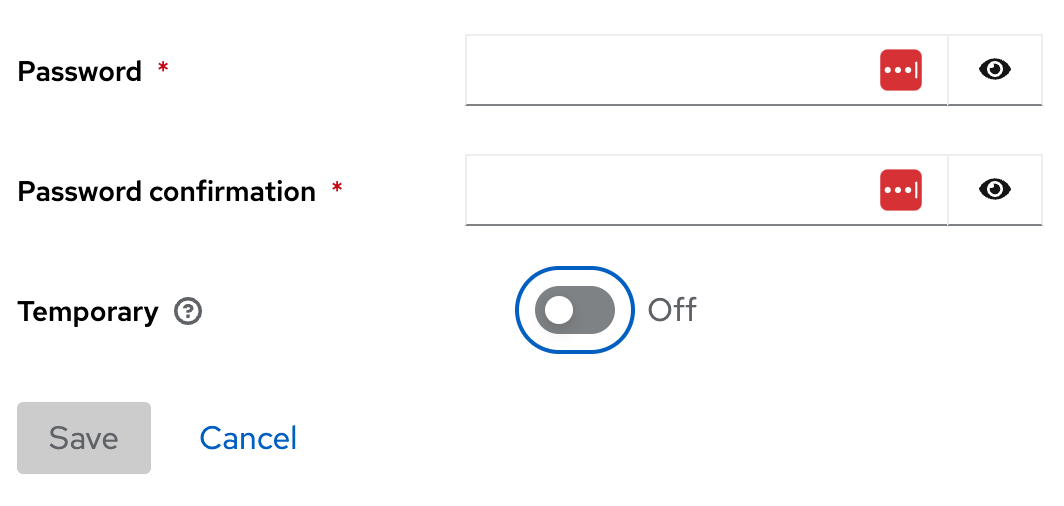
Choose a simple password, ensure ‘Temporary’ is disabled and click ‘Save’
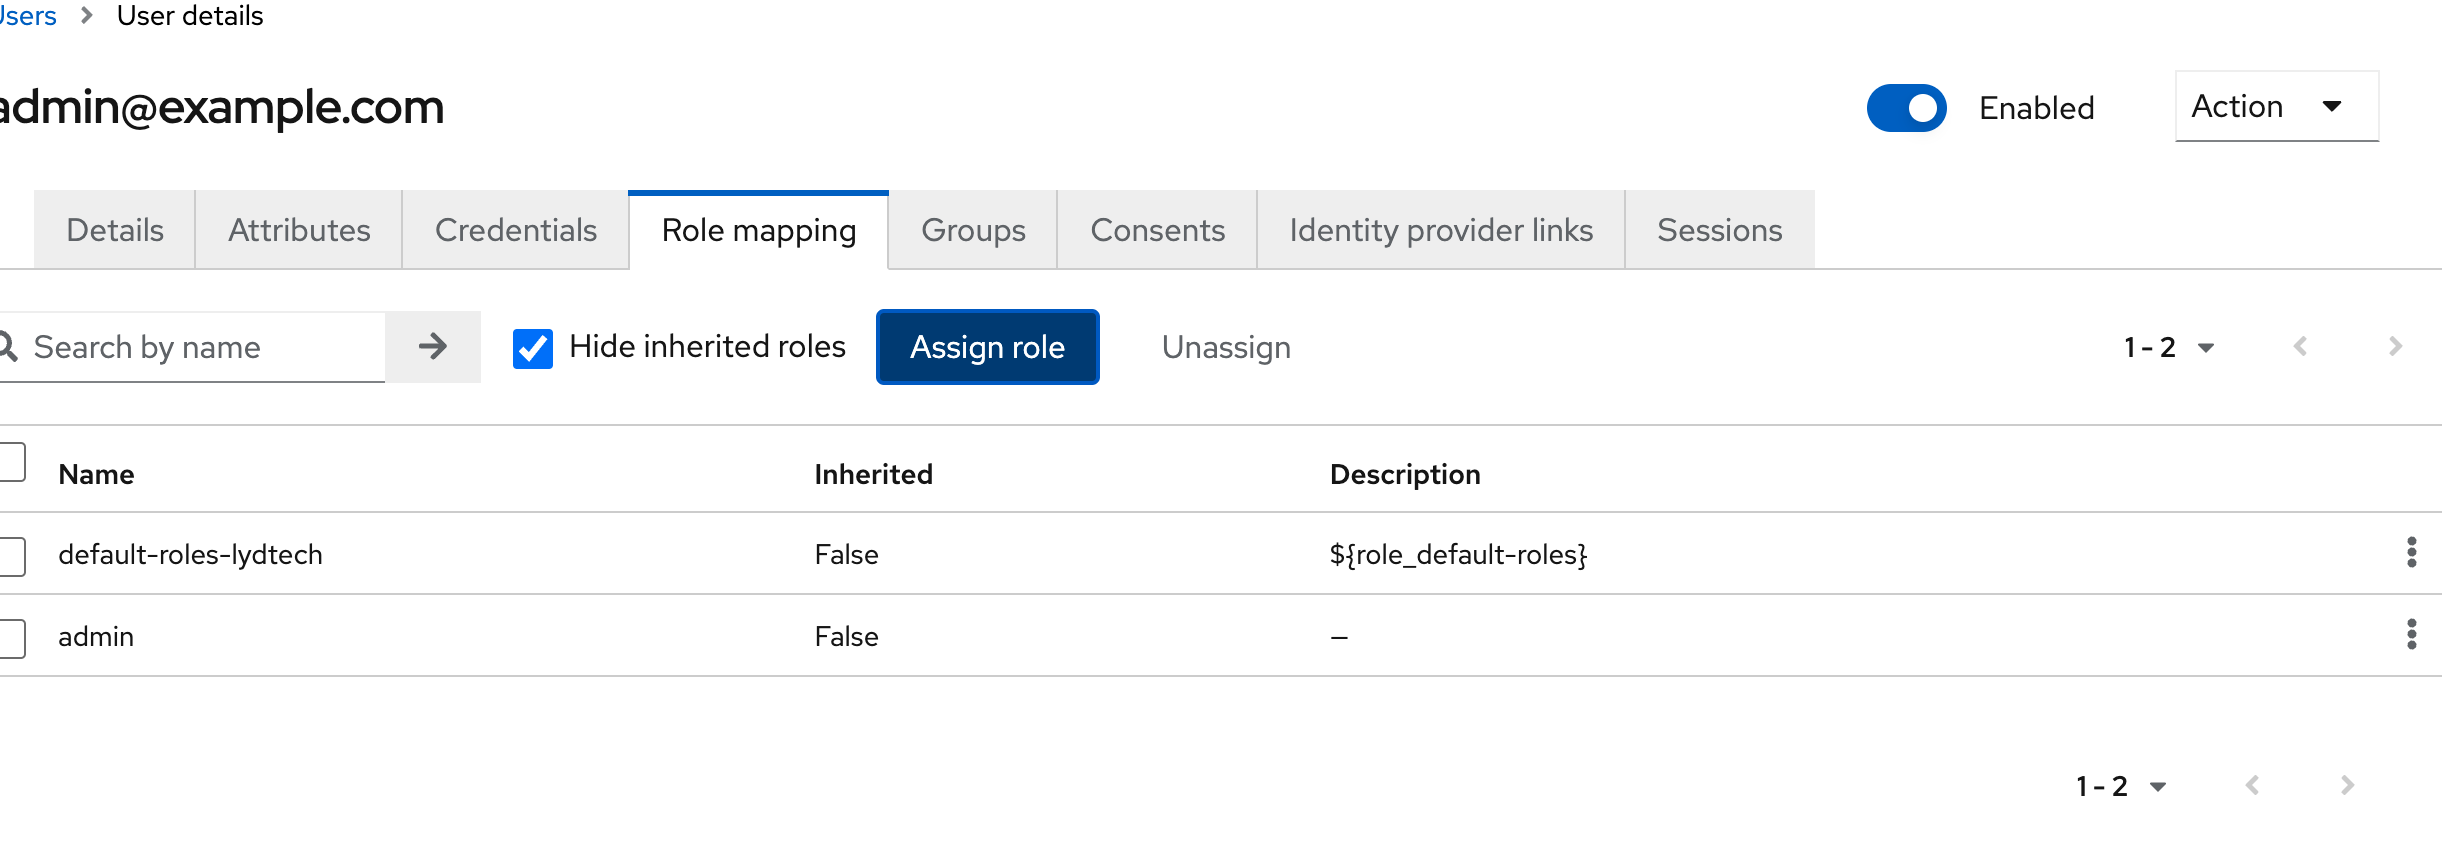
Finally, we need to map the user to the admin role we created previously. This can be done on the ‘Role Mapping’ tab when the user is selected. Choose to ‘Assign Role’ and select the ‘admin’ role. When complete, the admin role should be visible in the table as seen below
Repeat this exercise to create another user ‘user@example.com’ , choosing the ‘user’ role this time during role mapping
Create OAuth Client
Now that we have our realm, users and roles created, it is time to create our OAuth client. A Keycloak client represents an OAuth client application and is able to request Keycloak to authenticate a user. Typically a separate client would be created for each application that will authenticate / authorise users in your realm. For this article we will create a ‘public’ type client with the name ‘lydtech-public-client’
To create a client, navigate to ‘Clients’ and click ‘Create Client’. You will have 3 pages to complete.
Under ‘General Settings’, Client Type needs to be ‘OpenID Connect’. Choose an appropriate clientID - ‘lydtech-public-client’ in this case

Next under ‘Capability config’, ensure the following:
- ‘Client authentication’ should be disabled. This is a ‘public’ client type, not ‘confidential’
- For authentication flows, ensure only ‘Standard flow’ is selected - this is the ‘Authorisation Code’ flow that we focused on in Part 1. ‘Direct access grants’ will be enabled by default, but we do not want this; this is effectively a ‘Password’ grant type which is discouraged, and deprecated in OAuth 2.1.
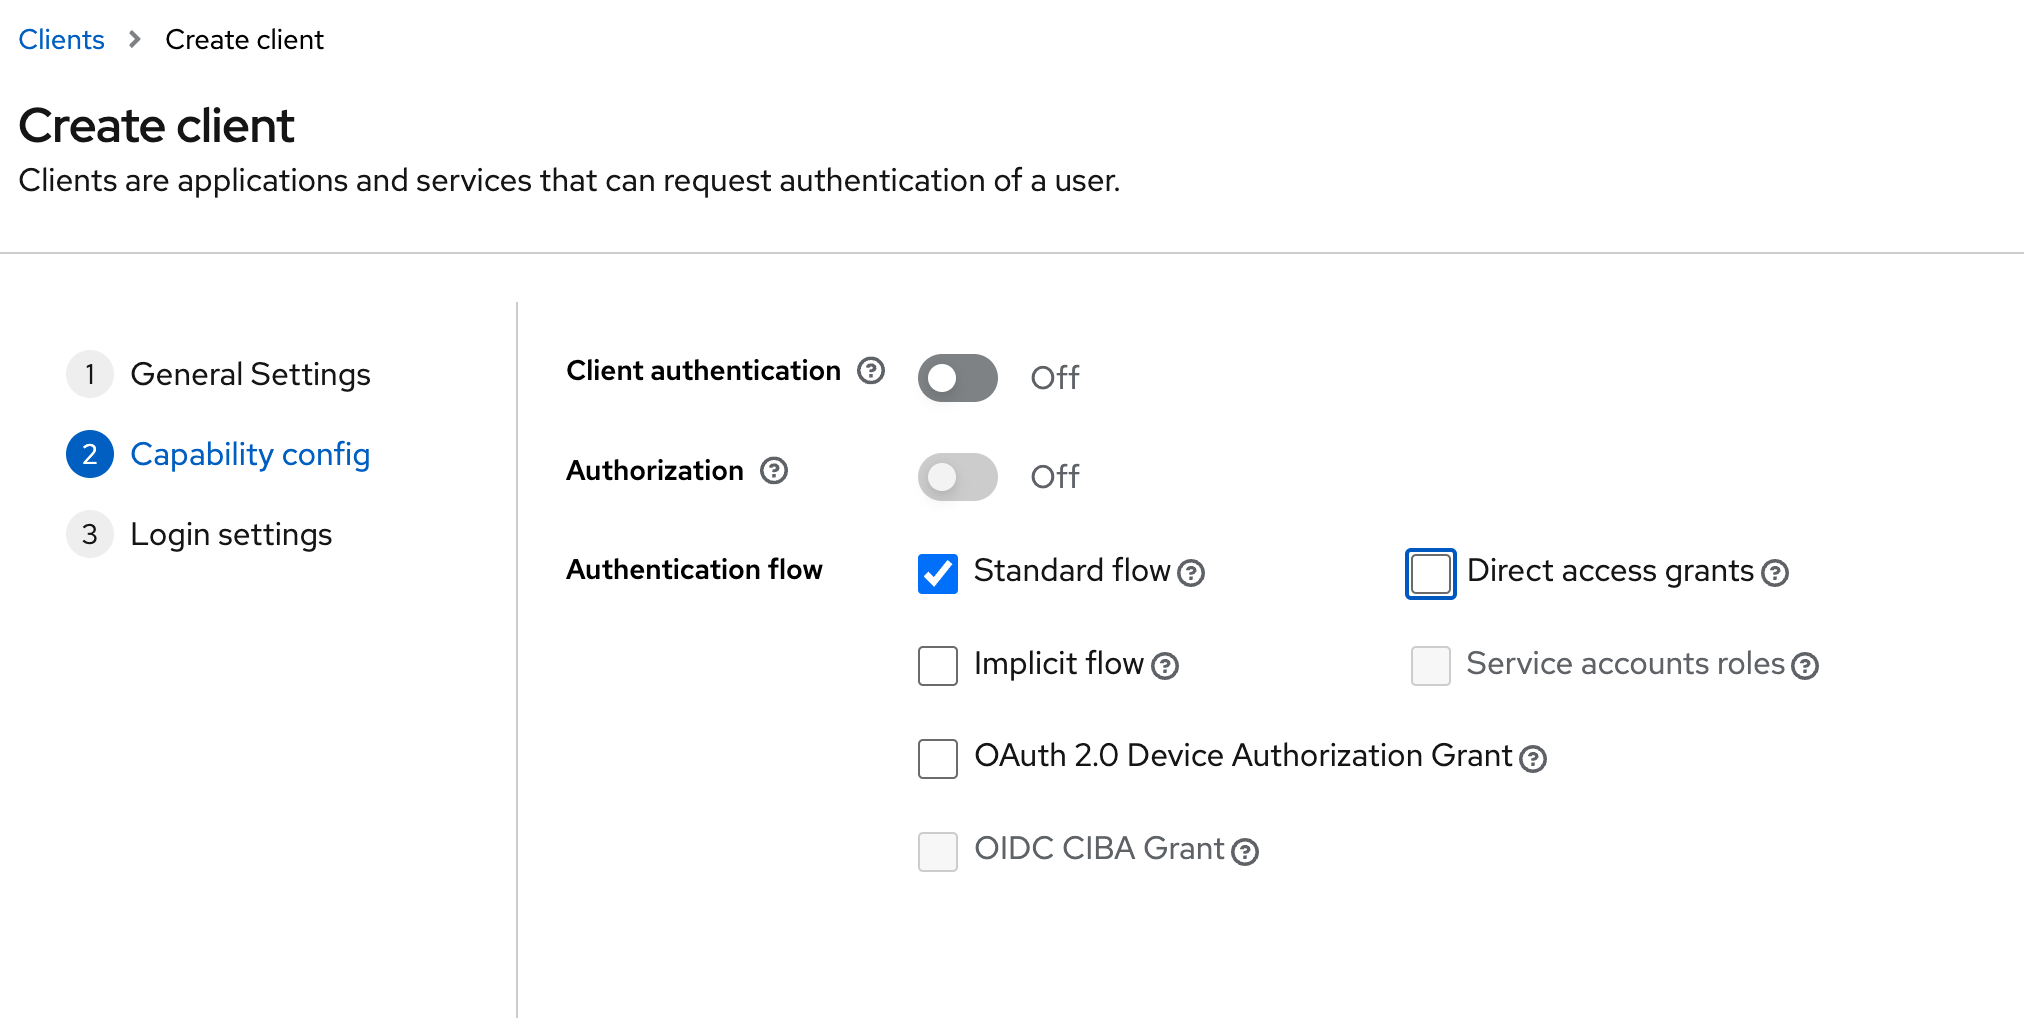
Finally, under ‘Login Settings’ we need to provide the same URL (http://localhost:3000) for both a ‘Valid redirect URI’ and a ‘Web Origin’. The former will allow our SPA to ask Keycloak to redirect back to it after a successful login while the latter will allow the SPA to make HTTP calls to Keycloak from a different origin (think CORS). We use the same value for both - our SPA client app will run locally on port 3000.

As we’ve disabled the Direct Access Grant (Password Grant) there isn’t an easy way to generate a JWT token for this client as a test of what we just created. It is worth visiting the following URL at this stage to verify we’ve configured the basics correctly: http://localhost:8080/realms/lydtech/.well-known/openid-configuration - the JSON response will contain configuration information that can be used for discovery purposes.
Creating a Spring Boot Resource Server
Create the project
Now that we have a fully configured Authorisation Server, we can create our Resource Server. For this we will use Spring Boot to expose a simple REST API with 3 endpoints. We will use Spring Security to protect the 3 endpoints.
Visit start.spring.io to create the template for the Resource Server. Use settings such as those in the image below but be sure to include the following dependencies:
- Spring Web - Needed to provide the REST API
- Lombok - Helps to reduce boilerplate code
- OAuth2 Resource Server - pulls in the required dependencies to configure the service as an OAuth Resource Server

Click Generate to download a zip file containing the project, unzip this project in a suitable directory and open it in your favourite IDE.
Create REST endpoints
First let's create our single Controller class which will expose 3 endpoints as follows:
- GET /v1/api/public - any user will be able to call this, even if they are unauthenticated (anonymous)
- GET /v1/api/user - any admin or user role will be able to call this
- GET /v1/api/admin - only admin roles will be able to call this
Complete controllers/MyController.java file available in the Github repository
package dev.lydtech.security.simpleresourceserver.controller;

import lombok.extern.slf4j.Slf4j;
import org.springframework.http.ResponseEntity;
import org.springframework.web.bind.annotation.CrossOrigin;
import org.springframework.web.bind.annotation.GetMapping;
import org.springframework.web.bind.annotation.RequestMapping;
import org.springframework.web.bind.annotation.RestController;

import java.security.Principal;
import java.util.Optional;

@RestController
@RequestMapping("/api/v1")
@Slf4j
@CrossOrigin(origins = "http://localhost:3000")
public class MyController {
    @GetMapping("/public")
    public ResponseEntity<String> publicEndpoint(Principal principal) {
        log.info("/public called");

        String message = getPrincipalName(principal);
        return ResponseEntity.ok("Hello from Public endpoint - " + message);
    }

    @GetMapping("/user")
    public ResponseEntity<String> userEndpoint(Principal principal) {
        log.info("/user called");

        String message = getPrincipalName(principal);
        return ResponseEntity.ok("Hello from User endpoint - " + message);
    }

    @GetMapping("/admin")
    public ResponseEntity<String> adminEndpoint(Principal principal) {
        log.info("/admin called");

        String message = getPrincipalName(principal);
        return ResponseEntity.ok("Hello from Admin endpoint - " + message);
    }

    private static String getPrincipalName(Principal principal) {
        return Optional.ofNullable(principal)
                .map(Principal::getName)
                .orElse("Not available");
    }
}
There isn’t a great deal to explain here for those familiar with Spring, but a few key points:
- The @RestController and @RequestMapping("/api/v1") annotations are used to expose a REST API.
- @GetMapping is used for each of the 3 endpoints. The 3 endpoints have a single method parameter of type java.security.Principal - this will contain details of the authenticated user.
- @CrossOrigin is required to allow the SPA client to call the endpoint from a different host/port origin.
- Each endpoint will return a simple string containing a message and the authenticated username (if present).
Extract role details from Keycloak JWT
The following class is needed to customise some of the information that is extracted from the JWT:
Complete JwtAuthConverter.java file available in the Github repository
package dev.lydtech.security.simpleresourceserver;

import org.springframework.core.convert.converter.Converter;
import org.springframework.security.authentication.AbstractAuthenticationToken;
import org.springframework.security.core.GrantedAuthority;
import org.springframework.security.core.authority.SimpleGrantedAuthority;
import org.springframework.security.oauth2.jwt.Jwt;
import org.springframework.security.oauth2.server.resource.authentication.JwtAuthenticationToken;
import org.springframework.security.oauth2.server.resource.authentication.JwtGrantedAuthoritiesConverter;
import org.springframework.stereotype.Component;

import java.util.Collection;
import java.util.Map;
import java.util.Set;
import java.util.stream.Collectors;
import java.util.stream.Stream;

@Component
public class JwtAuthConverter implements Converter<Jwt, AbstractAuthenticationToken> {
    private final JwtGrantedAuthoritiesConverter jwtGrantedAuthoritiesConverter = new JwtGrantedAuthoritiesConverter();

    @Override
    public AbstractAuthenticationToken convert(Jwt jwt) {
        Collection<GrantedAuthority> authorities = Stream.concat(
                jwtGrantedAuthoritiesConverter.convert(jwt).stream(),
                extractRealmRoles(jwt).stream()).collect(Collectors.toSet());
        return new JwtAuthenticationToken(jwt, authorities, jwt.getClaim("preferred_username"));
    }

    private Collection<? extends GrantedAuthority> extractRealmRoles(Jwt jwt) {
        Map<String, Object> realmAccess = jwt.getClaim("realm_access");
        Collection<String> realmRoles;
        if (realmAccess == null
                || (realmRoles = (Collection<String>) realmAccess.get("roles")) == null) {
            return Set.of();
        }
        return realmRoles.stream()
                .map(role -> new SimpleGrantedAuthority("ROLE_" + role))
                .collect(Collectors.toSet());
    }
}
This code perform 2 functions:
- Use the preferred_username claim from the JWT for the principal name. Without this the principal name would be the ‘sub’ claim which is a UUID
- Extract the Keycloak ‘Realm Roles’ from the JWT token and map to a collection of GrantedAuthorities stored against the principal. The last section of this article shows some examples of JWT access_tokens issued by Keycloak and calls out where role information is contained.
Configure Security
We need to include a Spring configuration class in order to configure the Security Filter Chain that will secure the 3 endpoints. Some points to note:
.requestMatchersis used to allow the relevant roles for the correct URL patterns.- The
JWTAuthConverterbean we created above is registered with Spring Security - HTTP sessions are disabled (this is a stateless REST API that does not require sessions)
- A CORS filter is added to allow the API to be called from a different origin (the SPA app)
Complete WebSecurityConfig.java file available in the Github repository
package dev.lydtech.security.simpleresourceserver;

import lombok.RequiredArgsConstructor;
import org.springframework.context.annotation.Bean;
import org.springframework.context.annotation.Configuration;
import org.springframework.http.HttpMethod;
import org.springframework.security.config.annotation.web.builders.HttpSecurity;
import org.springframework.security.config.annotation.web.configuration.EnableWebSecurity;
import org.springframework.security.config.http.SessionCreationPolicy;
import org.springframework.security.web.SecurityFilterChain;

@RequiredArgsConstructor
@Configuration
@EnableWebSecurity
public class WebSecurityConfig {

    private final JwtAuthConverter jwtAuthConverter;

    @Bean
    public SecurityFilterChain securityFilterChain(HttpSecurity http) throws Exception {
        http
                .authorizeHttpRequests(authorize -> authorize
                        //Don't have to be authenticated to call anything under public
                        .requestMatchers(HttpMethod.GET, "/api/v1/public", "/api/v1/public/**").permitAll()
                        //Only admins can access anything under admin
                        .requestMatchers(HttpMethod.GET, "/api/v1/admin", "/api/v1/admin/**").hasRole("admin")
                        //Users and admins can access user endpoints
                        .requestMatchers(HttpMethod.GET, "/api/v1/user").hasAnyRole("admin", "user")
                        .anyRequest().authenticated()
                ).oauth2ResourceServer(oauth2 -> oauth2
                        .jwt(jwt -> jwt
                                .jwtAuthenticationConverter(jwtAuthConverter)
                        )
                ).sessionManagement(sm -> sm
                        .sessionCreationPolicy(SessionCreationPolicy.STATELESS)
                ).cors(withDefaults());
        return http.build();
    }
}
Configure Spring Security
The final step to complete the simple Resource Server is to replace the contents of src/main/resources/application.properties with application.properties as per the extract below
server.port=8081

spring.security.oauth2.resourceserver.jwt.issuer-uri=http://localhost:8080/realms/lydtech
spring.security.oauth2.resourceserver.jwt.jwk-set-uri=${spring.security.oauth2.resourceserver.jwt.issuer-uri}/protocol/openid-connect/certs

logging.level.org.springframework.security=trace
Some points to note:
- The server port is set to 8081, the default of 8080 will clash with our Keycloak instance.
- The
spring.security.oauth2.resourceserver.jwtvalues are how we tell Spring Security how to validate the JWTs for this service. We are pointing it at the Keycloak realm we created and allowing it to get the set of public keys that Keycloak can use to sign the JWTs it creates. - The
org.spring.securitylog level is set to trace which can be really helpful in showing exactly what is happening in the security filters.
Testing the resource server
As a quick test of our resource server, start it up either by using the command
./mvnw spring-boot:run
or running the SimpleResourceServerApplication in your IDE.
Once the service has started, prove that it is running and that the public endpoint does not require an access token by hitting with curl:
curl -v http://localhost:8081/api/v1/public
Important points in the output:
< HTTP/1.1 200- a HTTP 200 responseHello from Public endpoint - Not available- shows that the response was returned but there is no user associated
Finally lets prove that the other endpoints do require an auth token
curl -v http://localhost:8081/api/v1/user
Note the < HTTP/1.1 401 response which shows that it requires an authenticated user to call it.
We’ll see the secured endpoints in action shortly
Creating an SPA client
The final piece in our Auth Jigsaw is the client itself. For this we’ll produce a very simple React Single Page Application (SPA) that can perform the Authorisation Grant flow dance and call our Resource Server with the generated Access Token.
Create a React app
Use create-react-app to create the project template
npx create-react-app simple-client-example --template typescript
Install libraries
From the newly created project root directory, run the following to install some required libraries
npm install axios react-oauth2-code-pkce
react-oauth2-code-pkce- a handy library that supplies the code required to perform the OAuth Authorisation Code flow dance as a clientaxios- required to make HTTP calls to the REST API we created earlier
Code the app
Remove src/App.tsx, src/App.test.tsx and overwrite src/index.tsx with the following. Complete src/index.tsx file available in the Github repository but included here in full with descriptions for each section.
Import the required libraries
import React, {useContext, useState} from 'react';
import ReactDOM from 'react-dom/client';
import axios from 'axios';
import {AuthContext, AuthProvider, IAuthContext, TAuthConfig, TRefreshTokenExpiredEvent} from "react-oauth2-code-pkce"
Configure the Auth config which includes
- The clientId to the Keycloak client we created earlier.
- The 2 OAuth endpoints that we introduced in Part 1: /auth and /token
- The logout URL of the Keycloak server and realm
- The redirectUri to return to following successful authentication
const authConfig: TAuthConfig = {
    clientId: 'lydtech-public-client',
    authorizationEndpoint: 'http://localhost:8080/realms/lydtech/protocol/openid-connect/auth',
    tokenEndpoint: 'http://localhost:8080/realms/lydtech/protocol/openid-connect/token',
    logoutEndpoint: 'http://localhost:8080/realms/lydtech/protocol/openid-connect/logout',
    redirectUri: 'http://localhost:3000',
    scope: 'openid',
    onRefreshTokenExpire: (event: TRefreshTokenExpiredEvent) => window.confirm('Session expired. Refresh page to continue using the site?') && event.login(),
}
A function to make calls to the REST Endpoints we configured earlier, using Axios
const callEndpoint = async (url: string, token: string) => {
    const currentdate = new Date();
    const datetime = currentdate.getDate() + "/"
        + (currentdate.getMonth()+1)  + "/"
        + currentdate.getFullYear() + " @ "
        + currentdate.getHours() + ":"
        + currentdate.getMinutes() + ":"
        + currentdate.getSeconds();

    var message;

    try {
        const response = await axios.get(url, {headers: {'Authorization': `Bearer ${token}`}});
        message = response.data;
    } catch (error) {
        if (axios.isAxiosError(error)) {
            console.log(`error calling endpoint ${url}: ${error}`)
            if (error.response) {
                message = `Error: ${error.response.status}`
            } else {
                message = error;
            }
        } else {
            throw error;
        }
    }
    return `called at ${datetime} - ${message}`;
}
Now we declare a React component that
- Prints the full JWT access token to the screen
- Prints the decoded JWT access token to the screen
- Has a button to call each of the Resource Server endpoints
- Has a logout button
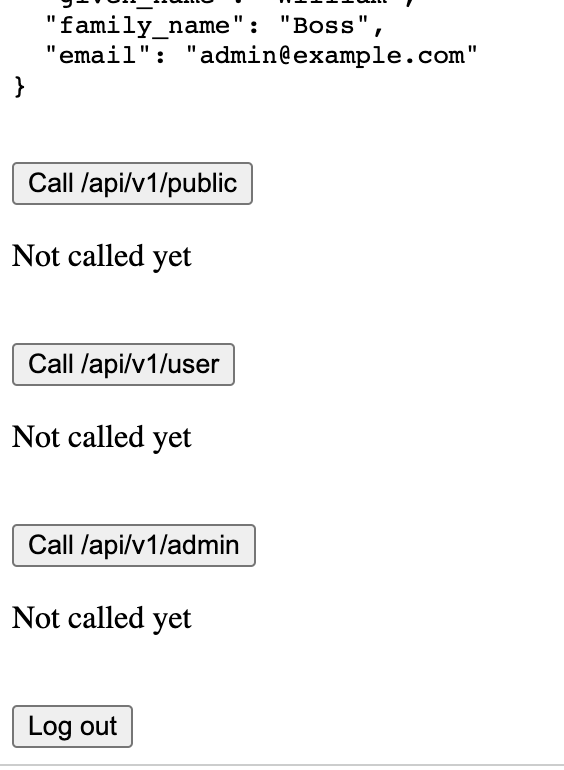
const UserInfo = (): JSX.Element => {
    const {token, tokenData, logOut} = useContext(AuthContext)
    const [publicResponse, setPublicResponse] = useState("Not called yet");
    const [adminResponse, setAdminResponse] = useState("Not called yet");
    const [userResponse, setUserResponse] = useState("Not called yet");

    const callPublic = async () => {
        const message = await callEndpoint('http://localhost:8081/api/v1/public', token);
        setPublicResponse(message);
    }

    const callAdmin = async () => {
        const message = await callEndpoint('http://localhost:8081/api/v1/admin', token);
        setAdminResponse(message);
    }

    const callUser = async () => {
        const message = await callEndpoint('http://localhost:8081/api/v1/user', token);
        setUserResponse(message);
    }

    return <>
        <h4>Your complete Access Token</h4>
        <pre>{token}</pre>

        <h4>Your decoded JWT payload </h4>
        <pre>{JSON.stringify(tokenData, null, 2)}</pre>

        <br/>
        <button onClick={callPublic}>Call /api/v1/public</button>
        <p>{publicResponse}</p>

        <br/>
        <button onClick={callUser}>Call /api/v1/user</button>
        <p>{userResponse}</p>

        <br/>
        <button onClick={callAdmin}>Call /api/v1/admin</button>
        <p>{adminResponse}</p>

        <br/>
        <button onClick={() => logOut()}>Log out</button>

    </>
}
The React boilerplate code to bootstrap the application. Note that the UserInfo component is wrapped inside an AuthProvider, which is supplied by the react-oauth2-code-pkce library - this is what will take care of redirecting the user to Keycloak for authentication and then converting the authorisation code to an access token.
const root = ReactDOM.createRoot(
    document.getElementById('root') as HTMLElement
);
root.render(
    <AuthProvider authConfig={authConfig}>
        <UserInfo/>
    </AuthProvider>
);
Test the client runs
Run the client app using npm start (note that npm install will be required if you haven't followed the steps above in this guide) and make sure it starts successfully and that there are no errors.
Testing the end result
Start the applications
Ensure the following are started:
- Keycloak in Docker
- The Resource Server REST API via Maven or in your IDE
- The client application using npm
Test an Admin user
Visit http://localhost:3000 in a browser. The application should immediately redirect you to the Keycloak login page as per the screenshot below

Sign in using the admin@example.com user that we created earlier. Upon successful login you should be shown the main app page similar to the image below.

Observe the following:
- The complete access token at the top
- The decoded JWT payload showing all the claims
- Note the ‘admin’ entry in realm_access.roles - this shows that the user has the admin role that we created earlier
- The user’s username (email address in this case) is available in the preferred_username claim
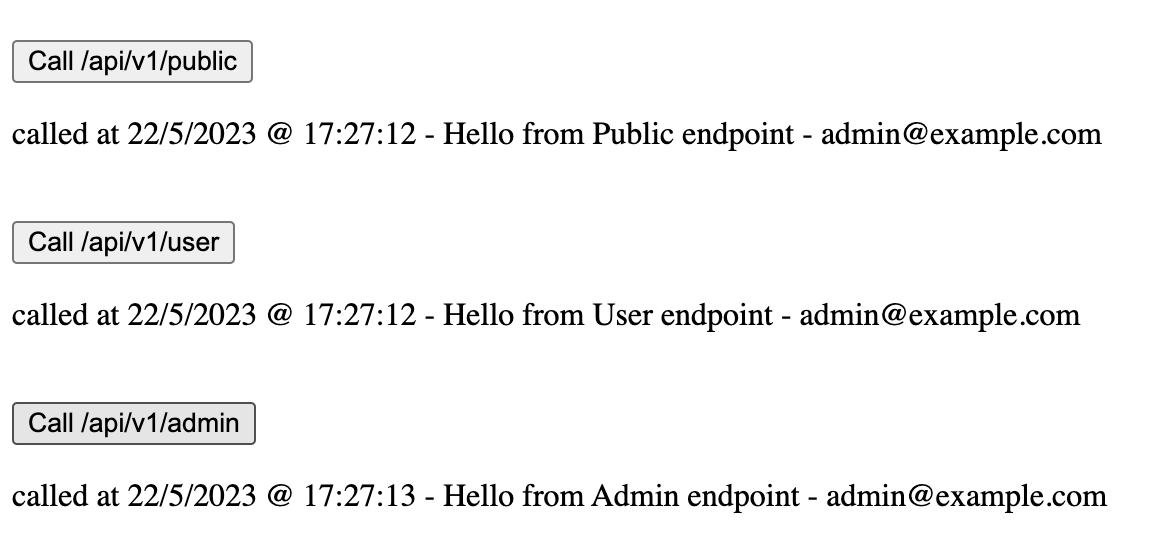
Scrolling down will show the 3 buttons to call each of the API endpoints
The ‘Not called yet’ placeholder shows the endpoints have not been called yet. Click each of the 3 buttons and see that each of the successful responses is shown on screen, also note that each response contains the user’s username - showing that the Principal was available in the Spring Boot app
Test a non Admin user
Use the ‘Log out’ button to log out as the admin user. You should be redirected to the Keycloak login screen again. This time log in as the user@example.com user we created.
Once logged in you will see from the JWT contents that this user only has the ‘user’ role, not the ‘admin’ role

Now click each of the 3 buttons to attempt to call the 3 endpoints. This time you should see something like the following.

Notice that /public and /user were successful but /admin resulted in a 403 proving that this user is not in the ‘admin’ role and therefore is not allowed to access the endpoint.
Following the Authorisation Code flow
Now that we’ve seen it work, let’s look at each step in the flow to be able to link it to the theory in Part 1. Using Chrome DevTools we can capture each of the interesting HTTP requests that make up the flow. The sequence diagram below shows each call, labelled with a number, which is expanded on below:


Authorisation Request
Request
Upon loading the application into the browser (from http://localhost:3000), the react-oauth2-code-pkce realises that the user is not logged in and therefore has no access_token so redirects to the Keycloak login screen. Note, as you will see from step 1 in the sequence diagram above, this isn't via a HTTP redirect but rather by asking the browser to take the user to the Keycloak login screen via Javascript code.
Response
The response from Keycloak is a HTML page containing a login page with a username & password field and a ‘Log in’ button

User authenticates with Keycloak
Request
The user types in their username & password then clicks Log In
Response
Upon a successful log in, Keycloak redirects back to our SPA app as requested

Token request
Request
The SPA application can then exchange the authorisation code for an access_token with Keycloak
Response
This includes an access token, refresh token and (because we requested the oidc scope) an ID token (all in the form of JWT tokens). Note the access tokens have been truncated for readability. They are included in full below.
Note you could copy any of these tokens into jwt.io to view the full contents.
access_token
eyJhbGciOiJSUzI1NiIsInR5cCIgOiAiSldUIiwia2lkIiA6ICJqanoyd0ZEVXhzUGdZYWowcV9FbzUtdEgxWlAzMldwMldNdDltY3RCal9RIn0.eyJleHAiOjE2ODQ4MzEyNjUsImlhdCI6MTY4NDgzMDk2NSwiYXV0aF90aW1lIjoxNjg0ODMwOTY1LCJqdGkiOiI0OTEyZGI5YS01NDIxLTRiMDQtOWIzNC1hYjVhMTg2MDI4ZmIiLCJpc3MiOiJodHRwOi8vbG9jYWxob3N0OjgwODAvcmVhbG1zL2x5ZHRlY2giLCJhdWQiOiJhY2NvdW50Iiwic3ViIjoiOWRlZGQzMmYtYjIxMi00MWVjLTkyOTEtZDdhY2JiM2YxNDdmIiwidHlwIjoiQmVhcmVyIiwiYXpwIjoibHlkdGVjaC1wdWJsaWMtY2xpZW50Iiwic2Vzc2lvbl9zdGF0ZSI6ImEzZTBiMWZlLTNlZGItNGZjNC05OTQyLTEyMDgzMzM0Mzg5ZCIsImFjciI6IjEiLCJhbGxvd2VkLW9yaWdpbnMiOlsiaHR0cDovL2xvY2FsaG9zdDozMDAwIl0sInJlYWxtX2FjY2VzcyI6eyJyb2xlcyI6WyJkZWZhdWx0LXJvbGVzLWx5ZHRlY2giLCJvZmZsaW5lX2FjY2VzcyIsImFkbWluIiwidW1hX2F1dGhvcml6YXRpb24iXX0sInJlc291cmNlX2FjY2VzcyI6eyJhY2NvdW50Ijp7InJvbGVzIjpbIm1hbmFnZS1hY2NvdW50IiwibWFuYWdlLWFjY291bnQtbGlua3MiLCJ2aWV3LXByb2ZpbGUiXX19LCJzY29wZSI6Im9wZW5pZCBlbWFpbCBwcm9maWxlIiwic2lkIjoiYTNlMGIxZmUtM2VkYi00ZmM0LTk5NDItMTIwODMzMzQzODlkIiwiZW1haWxfdmVyaWZpZWQiOnRydWUsIm5hbWUiOiJXaWxsaWFtIEJvc3MiLCJwcmVmZXJyZWRfdXNlcm5hbWUiOiJhZG1pbkBleGFtcGxlLmNvbSIsImdpdmVuX25hbWUiOiJXaWxsaWFtIiwiZmFtaWx5X25hbWUiOiJCb3NzIiwiZW1haWwiOiJhZG1pbkBleGFtcGxlLmNvbSJ9.rXEp7F6JGBQ8_xCLs0A39KUVuO3AyYKslArIZQs2BFCKPOEvi9xW4SQEMToYPnX-qw0nEssgkBgvbaJQcCicJ9TA8D_v-TiLs_KqcnYgiIvt7yQtLBp57Fad0L_foiaCrDj8Nq9WqqjujsGbrXlDXG6_2EoqUCmtf1nKLkCYWY3ySsLAb2kVwkp1diXQFiIs8oTIKtnAPgZ-fMM5HoQ2zZ1fbFgY3vGWF_xwe5UpVUYsAEi2BIqmUPRnCnfnzskbnZfd7LQ5eV_Y0-54F8CuszCo9vi1R5tMb3mJuHbVeyEVRdlOiq6RParoZsDPGXY23Aq4ivbuxQvg0PmP9WxGfAid_token
eyJhbGciOiJSUzI1NiIsInR5cCIgOiAiSldUIiwia2lkIiA6ICJqanoyd0ZEVXhzUGdZYWowcV9FbzUtdEgxWlAzMldwMldNdDltY3RCal9RIn0.eyJleHAiOjE2ODQ4MzEyNjUsImlhdCI6MTY4NDgzMDk2NSwiYXV0aF90aW1lIjoxNjg0ODMwOTY1LCJqdGkiOiI0ZDI4YzdmNy03YzhkLTQ2MTItOGY0ZS00NzFmZTliNzc1MTciLCJpc3MiOiJodHRwOi8vbG9jYWxob3N0OjgwODAvcmVhbG1zL2x5ZHRlY2giLCJhdWQiOiJseWR0ZWNoLXB1YmxpYy1jbGllbnQiLCJzdWIiOiI5ZGVkZDMyZi1iMjEyLTQxZWMtOTI5MS1kN2FjYmIzZjE0N2YiLCJ0eXAiOiJJRCIsImF6cCI6Imx5ZHRlY2gtcHVibGljLWNsaWVudCIsInNlc3Npb25fc3RhdGUiOiJhM2UwYjFmZS0zZWRiLTRmYzQtOTk0Mi0xMjA4MzMzNDM4OWQiLCJhdF9oYXNoIjoid2RfMFpYdVdCRll3T1otdzBDV3FtUSIsImFjciI6IjEiLCJzaWQiOiJhM2UwYjFmZS0zZWRiLTRmYzQtOTk0Mi0xMjA4MzMzNDM4OWQiLCJlbWFpbF92ZXJpZmllZCI6dHJ1ZSwibmFtZSI6IldpbGxpYW0gQm9zcyIsInByZWZlcnJlZF91c2VybmFtZSI6ImFkbWluQGV4YW1wbGUuY29tIiwiZ2l2ZW5fbmFtZSI6IldpbGxpYW0iLCJmYW1pbHlfbmFtZSI6IkJvc3MiLCJlbWFpbCI6ImFkbWluQGV4YW1wbGUuY29tIn0.I6fFM5cSJo5zi-kLZDX8jVsDsInHdyRK6LOTw4MN9liVYfi2-7VDAqtslON9ruqB0yoVUWe3hsFHUDOeEtRop5p2YM71y3d3kCGw9zuusBjDtb4LBsaWjnizf5FPCckKExbprpQ_l24fAg3Gj8UiwA2soSSX7HvqcHEGZWL2cqHwGu-hlSuNJrp2H3oKuV4fz_JaBMt4Xp5rO-H-citC-0Za3KArm_hzCIMOcaTL024KAwwlLWIHQRB7QYBbjw-ZgnVjF1KuEpj19myqEV_zIxWDSGzh3mjfzqlt1WyEjRSSnX9q7kpodeCiwoL-Pr1SIjWI3pUb55s_rtQU3P9bCQrefresh_token
eyJhbGciOiJIUzI1NiIsInR5cCIgOiAiSldUIiwia2lkIiA6ICJiYWI2ZTA3NS00NzZhLTRlZTktOWZkMC1mZjJiM2MyM2FkNzMifQ.eyJleHAiOjE2ODQ4MzI3NjUsImlhdCI6MTY4NDgzMDk2NSwianRpIjoiYjIyMmFkMTctNDI1Ny00N2MwLWIwNDctYWYxZWVkYmJjYWEwIiwiaXNzIjoiaHR0cDovL2xvY2FsaG9zdDo4MDgwL3JlYWxtcy9seWR0ZWNoIiwiYXVkIjoiaHR0cDovL2xvY2FsaG9zdDo4MDgwL3JlYWxtcy9seWR0ZWNoIiwic3ViIjoiOWRlZGQzMmYtYjIxMi00MWVjLTkyOTEtZDdhY2JiM2YxNDdmIiwidHlwIjoiUmVmcmVzaCIsImF6cCI6Imx5ZHRlY2gtcHVibGljLWNsaWVudCIsInNlc3Npb25fc3RhdGUiOiJhM2UwYjFmZS0zZWRiLTRmYzQtOTk0Mi0xMjA4MzMzNDM4OWQiLCJzY29wZSI6Im9wZW5pZCBlbWFpbCBwcm9maWxlIiwic2lkIjoiYTNlMGIxZmUtM2VkYi00ZmM0LTk5NDItMTIwODMzMzQzODlkIn0.rpS8agLUWBbHfI89MZ9_1Y_CHREIemo_YwgOtAEQhsE

Resource Server calls
Request
Any call to the Resource Server will contain the access token returned above in the Authorization HTTP header as a Bearer token
MethodGETURLhttp://localhost:8081/api/v1/userHTTP Header NameHeader ValueDescriptionAuthorizationBearer <access_token>Contains the access_token returned from Keycloak above as a Bearer token
Response
HTTP Response Code200 (OK)Body ContentDescriptionHello from User endpoint - admin@example.comContent returned by REST endpoint /v1/api/user - just echoes the username in this case
Summary
This article builds upon the theory introduced in Part 1 of this series. It created all the components of an architecture that leveraged OIDC & OAuth to provide authentication and authorisation via a ‘public’ client. We created and configured:
- An Authorisation Server using Keycloak
- A Resource Server in the shape of a REST API provided by Spring Boot
- A client application in the form of a React SPA app
- We showed these 3 things working together and followed the Authorisation Code Grant flow step by step, having looked at the theory for this in Part 1.
All the code is available in the following Github repositories:
- https://github.com/lydtechconsulting/oauth-simple-client
- https://github.com/lydtechconsulting/oauth-simple-resource-server
Part 3 of this series shows how the Authorisation Code Grant flow can be used with a confidential client, using a traditional server side web application.
Part 4 Looks at replacing Keycloak for these projects with a custom Authorisation Server using Spring Authorisation Server project.